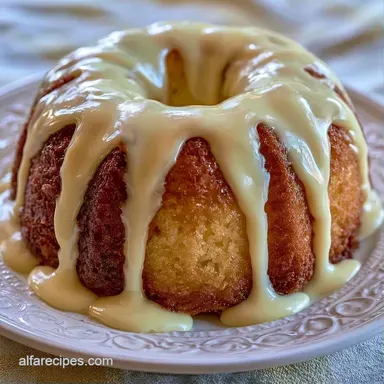
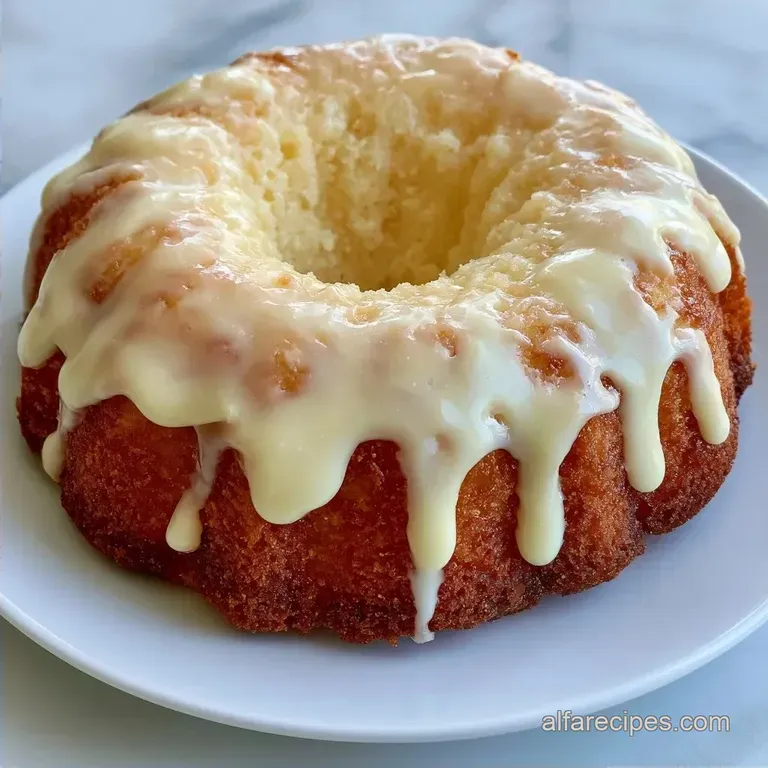
White Chocolate Ganache Cake: Creamy and Rich
- Time: 20 min active + 2 hrs 30 mins chilling/cooling
- Flavor/Texture Hook: Glossy and creamy
- Perfect for: Special celebrations
I've seen too many cakes where the frosting separates into an oily mess or the sponge is so dry it needs a glass of water to swallow. White chocolate is notoriously finicky because it has a lower melting point and more fat than dark chocolate.
If you overheat the cream or stir too aggressively, the emulsion breaks, leaving you with a grainy, curdled frosting that won't hold its shape.
This recipe fixes that by using a specific resting window and temperature control. By letting the chocolate sit undisturbed in the hot cream, we allow the cocoa butter to melt evenly before we introduce mechanical agitation.
The result is a White Chocolate Ganache Cake that stays stable at room temperature but melts the moment it hits your tongue. It's about ratios and timing, not luck.
White Chocolate Ganache Cake Guide
Right then, let's get into the specifics. Most people treat white chocolate like a candy, but in baking, it's a structural component. Because it lacks cocoa solids, it relies entirely on cocoa butter and milk solids for its body. This means the window between "pourable" and "seized" is very small.
The key here is the emulsion. We're creating a stable bond between the fats in the chocolate and the water in the heavy cream. If you rush the whisking or use cream that's boiling over, you'll break that bond.
I've learned the hard way that patience in the first five minutes of making the ganache is what determines if the cake looks professional or homemade in a bad way.
Trust me on this: don't skip the crumb coat. White chocolate is softer than dark chocolate, and without a chilled base layer, your final finish will be littered with cake crumbs. It takes an extra 30 minutes, but it's the difference between a clean look and a messy one.
Quick Recipe Specs
When you're working with a recipe this rich, precision is everything. You can't just eyeball the chocolate to cream ratio, or the cake will either be a rock or a puddle.
Precision Checkpoints:
- Oven Temp: Exactly 350°F (175°C) for an even rise.
- Rest Period:5 minutes of undisturbed sitting for the chocolate and cream.
- Chill Time:30 minutes for the crumb coat to set before the drip.
Decision Shortcut:
- If you want a firmer slice, chill the cake for 2 hours before cutting.
- If you want a sweeter drip, use a higher cocoa butter percentage chocolate.
- If you want a moister crumb, ensure the butter is exactly 65°F (18°C) when creaming.
How the Texture Works
The success of this cake depends on how we handle the fats and the air. Here is the breakdown of why these specific methods work.
- Creaming Process: Beating butter and sugar creates tiny air pockets. These pockets expand in the oven, which gives the sponge its lift.
- Emulsion Stability: The ganache works by suspending fat droplets in a water based liquid (the cream). The salt and butter we add at the end stabilize this, preventing the fat from leaching out.
- Starch Gelatinization: Using all purpose flour provides enough protein for structure but keeps the cake tender. According to King Arthur Baking, the protein content in flour directly impacts the "chew" of the crumb.
Fresh vs. Shortcut Chocolate
| Chocolate Type | Texture | Stability | Best For |
|---|---|---|---|
| Couverture/Blocks | Smooth | High | Filling and frosting |
| store-bought Chips | Slightly Grainy | Medium | Quick drips |
| Compound Chocolate | Waxy | Very High | over High heat environments |
The Ingredient List
I've tested this with a few different brands, and the quality of the white chocolate makes a massive difference. Avoid "white coatings" that use vegetable oil instead of cocoa butter, as they won't set properly for the drip.
For the Sponge:
- 2.5 cups all purpose flourWhy this? Balanced protein for a sturdy but soft crumb
- 1.5 cups granulated sugar
- 1 tbsp baking powder
- 0.5 tsp salt
- 0.75 cup unsalted butter, softenedWhy this? Provides flavor and air during creaming
- 3 large eggs
- 1 cup whole milk
- 2 tsp vanilla extract
For the Frosting:
- 16 oz white chocolate, finely choppedWhy this? Higher cocoa butter content for stability
- 1 cup heavy cream
- 2 tbsp unsalted butter, room temperature
- 0.25 tsp fine salt
For the Drip: - 4 oz white chocolate, finely chopped - 0.25 cup heavy cream
Substitution Options
| Original Ingredient | Substitute | Why It Works |
|---|---|---|
| Whole Milk (1 cup) | Buttermilk (1 cup) | Adds tang and tenderness. Note: May require 1/2 tsp extra baking soda |
| Heavy Cream (1 cup) | Full fat Coconut Milk | Similar fat content. Note: Adds a distinct coconut flavor |
| All purpose Flour | Cake Flour | Finer crumb. Note: Cake will be more fragile and prone to sinking |
Necessary Kitchen Tools

You don't need a professional bakery, but a few specific tools make this much easier. If you're using a stand mixer such as a KitchenAid, the creaming process is much more consistent.
- Two 8 inch round cake pans: Parchment paper is mandatory here. White chocolate cakes are sticky and will cling to the sides if you only grease the pan.
- Digital Kitchen Scale: Measuring flour by volume is risky. If you scoop too much, the cake becomes dense.
- Heat proof glass or metal bowl: Essential for the ganache. Plastic can warp or hold onto scents.
- Offset spatula: This is the only way to get that smooth, flat top for the drip.
- Whisk: Use a balloon whisk for the ganache to incorporate air without over beating.
Step by step Method
Let's crack on with the actual build. Follow these steps precisely to avoid the common pitfalls of white chocolate.
1. Baking the Base
Preheat your oven to 350°F (175°C). Grease and line two 8 inch round cake pans with parchment paper.
Cream the butter and sugar together. Do this for about 3-5 minutes until the mixture looks pale and fluffy. Add eggs one at a time, beating well after each addition, then stir in the vanilla.
Alternately add the flour, baking powder, salt, and milk. Start and end with the flour. Mix until just combined. If you overmix, the gluten develops too much and the cake becomes rubbery.
Pour batter into pans and bake 25-30 minutes until a toothpick comes out clean and the edges slightly pull away from the pan. Cool completely on a wire rack.
2. Creating the Silk
Place 16 oz of chopped white chocolate in your heat proof bowl. Heat 1 cup of heavy cream in a saucepan. Watch it closely; you want it to just begin to simmer, not reach a rolling boil.
Pour the hot cream over the chocolate. Now, stop. Let it sit undisturbed for 5 minutes. This is where the magic happens. The residual heat melts the chocolate without shocking it.
Whisk from the center outward until the mixture is glossy and smooth. Stir in the room temperature butter and salt. The butter adds a professional sheen and a bit of structural stability.
3. Assembly and the Drip
Place one cake layer down and spread a thick layer of the ganache. Top with the second layer. Coat the entire White Chocolate Ganache Cake in a thin crumb coat. This is just a light layer of frosting to trap crumbs. Chill in the fridge for 30 minutes.
Prepare the drip by melting 4 oz of white chocolate and 0.25 cup of heavy cream together. You can use a microwave in 20 second bursts or a double boiler.
Once the drip reaches a slow ribbon consistency meaning it falls in a steady stream without breaking carefully pour it around the edges of the chilled cake. Use a spoon to nudge the drips down the side.
Tips and Common Pitfalls
Working with white chocolate is a lesson in temperature. Most errors happen because the chocolate is either too hot or too cold.
Fixing Seized Chocolate
If your ganache suddenly turns grainy or clumps up, it has "seized." This usually happens if a drop of water gets into the chocolate or if it's overheated. You can sometimes fix this by whisking in a tablespoon of warm heavy cream or a tiny bit of vegetable oil very slowly.
If it's too far gone, you'll have to start over.
Preventing the "Yellow" Tint
Some white chocolates look very yellow. This is usually due to the quality of the cocoa butter. To get a brighter white, use a high-quality brand. For a truly white look, a tiny drop of violet food coloring can neutralize the yellow tones, but be careful not to overdo it.
Avoiding Sagging Frosting
If your frosting feels too soft to hold the weight of the cake, it's likely too warm. The ganache needs to cool to a spreadable consistency. If it's too runny, put it in the fridge for 10 minutes and whisk it again.
Troubleshooting Guide
| Problem | Root Cause | Solution |
|---|---|---|
| Ganache is grainy | Overheated or water contaminated | Whisk in warm cream slowly |
| Cake sank in middle | Oven door opened too early | Wait until 20 mins before checking |
| Drip is too thin | Ganache was too hot when poured | Chill the drip for 5 mins before applying |
Tasty Flavor Variations
While the classic version is a hit, you can tweak this to suit different tastes. Because the white chocolate is so sweet, adding tart or salty elements creates a better balance.
The Fruit Twist Adding a layer of fresh raspberries between the sponge and the frosting cuts through the richness. For an even deeper flavor, you can make a raspberry coulis. If you like other no bake desserts, you might enjoy this chocolate peanut butter pie for a similar level of decadence.
Toasted Coconut Crunch Toast 0.5 cup of shredded coconut in a dry pan until golden. Fold this into the ganache before frosting. The toasted nuttiness prevents the cake from feeling too sugary.
Almond Flour Swap Replace 0.5 cup of all purpose flour with almond flour. This makes the crumb denser and slightly moister, giving it a more "European" feel.
Low Sugar Alternative Use a sugar-free white chocolate substitute. Be warned that these often have different melting points, so you may need to increase the heavy cream by 2 tablespoons to keep the texture smooth. For those looking for a larger format cake for a party, a traditional graduation cake is a great alternative.
Storage and Waste Tips
Since this cake contains a high amount of dairy and fat, it needs proper care to stay fresh.
Storage Guidelines Keep the cake in an airtight container in the fridge for up to 5 days. Because of the cocoa butter, the cake will firm up significantly when cold. Always let it sit at room temperature for 30-60 minutes before serving to restore that creamy texture.
For the freezer, wrap individual slices in plastic wrap and foil. They'll stay good for 2 months. To reheat, let them thaw in the fridge overnight and then bring to room temperature.
Zero Waste Tips Don't throw away the cake scraps from leveling the tops. Crumble them up and mix them with a bit of leftover ganache to make "cake pops." If you have leftover cream, use it for your morning coffee or whisk it into a whipped cream topping for the slices.
Serving and Enjoying
The best way to serve a White Chocolate Ganache Cake is with a contrast in temperature and acidity. A side of fresh blackberries or a tart raspberry sauce balances the sweetness of the white chocolate.
Use a hot knife to slice. Run your knife under hot water, wipe it dry, and then make the cut. Repeat this for every single slice. This prevents the ganache from dragging across the sponge, giving you those clean, professional lines.
This recipe is all about the balance of fats and sugars. When you get the emulsion right, the result is a dessert that feels luxurious without being overwhelming. It's a tested, precise way to handle one of the most difficult ingredients in the kitchen. Enjoy the process and the result.
Recipe FAQs
Is this white chocolate ganache cake a great dessert for Valentine's Day?
Yes, it is a luxurious choice. The creamy white chocolate and glossy finish are visually stunning for a romantic occasion. If you love this level of sweetness, you might also enjoy the rich profile of a Southern dessert.
Is this a good recipe for a birthday cake?
Yes, it is a massive crowd pleaser. The combination of a fluffy sponge and decadent ganache gives it a professional, celebratory feel that guests love.
How to bring this cake to a party without the ganache dripping everywhere?
Chill the cake thoroughly before moving. This stabilizes the white chocolate drip and prevents it from sliding during transport.
Do you have a non-sugar version of this cake using Stevia?
No, I don't recommend it for this recipe. Stevia lacks the structural properties and moisture retaining qualities of granulated sugar, which would result in a dry, fragile cake.
Can I use milk chocolate instead of white chocolate for the ganache?
No, the consistency will change. Milk chocolate has a different fat-to-sugar ratio, which would make the ganache too soft to support the cake layers.
How to store the cake to maintain its creamy texture?
Keep it in an airtight container in the fridge for up to 5 days. Let the cake sit at room temperature for 30-60 minutes before serving to restore the cocoa butter's creaminess.
Is it true that a double boiler is the only way to melt white chocolate safely?
No, this is a common misconception. Pouring hot heavy cream over finely chopped chocolate in a heat proof bowl is just as effective and often faster.
White Chocolate Ganache Cake