Easy Chocolate Graduation Caps with Peanut Butter
- Time: 10 min active + 60 min chilling
- Flavor/Texture Hook: Snappy dark chocolate with a velvety peanut butter center
- Perfect for: Graduation parties and student dessert platters
You probably think you need professional silicone molds or a degree in confectionery arts to make themed treats. Forget that. You don't need to spend hours tempering chocolate or worrying about "bloom" when you're just trying to feed a group of excited graduates.
I once tried making these from scratch using a homemade ganache for the base, but they slumped the moment they hit room temperature. It was a mess. Using pre set candies as your building blocks provides the structural integrity you actually need for a party.
The result is a snap of dark chocolate and a creamy center that looks like it took hours. These Easy Chocolate Graduation Caps are all about assembly rather than complex chemistry, making them a reliable choice for anyone.
Easy Chocolate Graduation Caps
Structural Geometry: The wide, flat top of an inverted peanut butter cup creates a stable platform for the square. Adhesion: Melted chocolate acts as a high strength adhesive when chilled, locking the components together.
| Component | Freshly Made | Shortcut Method | Impact |
|---|---|---|---|
| Base | Tempered Chocolate | PB Cup | Much faster stability |
| Top | Cast Square | Chocolate Square | Zero molding time |
| Adhesive | Ganache | Melted Chocolate | Faster set time |
Ingredient Deep Dive
| Ingredient | What It Does | Best Swap |
|---|---|---|
| PB Cups | Provides the cap base | Mini cheesecake bites |
| Chocolate Squares | Forms the mortarboard | Semi sweet squares |
| Rolo Candies | Acts as the cap topper | Hershey's Kisses |
Recipe Specs
Trust me on this, the precision here matters. If your chocolate is too hot, it'll run; too cold, and it won't bond.
Chef: Use a microwave safe glass bowl for the melted chocolate. Avoid plastic, as it can hold onto heat unevenly and cause hot spots that burn the cocoa solids.
Ingredient Breakdown
- 16 mini peanut butter cups (approx. 140g) Why this? Flat bottom provides the best structural base
- 16 dark chocolate squares (approx. 100g) Why this? Consistent thickness for the top
- 16 Rolo candies (approx. 113g) Why this? Perfect size for the cap's crown
- 2 tbsp melted dark chocolate Why this? High cocoa butter content for a strong bond
Equipment Needed
You don't need much for this. A parchment lined baking sheet is non negotiable because chocolate sticks to everything. You'll also need a toothpick for the detail work and a small bowl for the melted chocolate.
If you're doing a huge batch, a small offset spatula helps move the finished caps without breaking the tassel.
Building the Caps
- Arrange the mini peanut butter cups upside down on a parchment lined tray, spacing them 1 inch (2.5cm) apart.
- Carefully center one dark chocolate square atop each inverted peanut butter cup, pressing down gently until flush.
- Dip the bottom of a Rolo candy into the melted dark chocolate. Note: Only dip the flat end for a clean look
- Position the Rolo in the center of the chocolate square.
- Use a toothpick to drag a small line of chocolate from the center to the edge of the square to simulate the tassel string.
- Refrigerate the tray for 60 minutes until the chocolate feels hard and immobile.
Pro Tips and Pitfalls

Getting the "tassel" right is the hardest part. If the chocolate is too thin, the line disappears; too thick, and it looks like a blob. For a clean finish, according to King Arthur Baking, melting chocolate slowly in 20 second intervals prevents the fats from separating.
Sliding Squares
If the squares aren't sitting flat, your peanut butter cups might be slightly dome shaped. Give them a very light press with your thumb before adding the square to create a flat surface.
Tassel Melting
Working in a hot kitchen will make the melted chocolate too fluid. If the tassel line is running, put the tray in the fridge for 2 minutes before drawing the line.
Condensation Bloom
Taking these straight from the fridge to a hot room can cause "sweat" or sugar bloom. Let them sit for 5 minutes before moving them to a serving platter.
| Problem | Root Cause | Solution |
|---|---|---|
| Cap falls apart | Not enough melted chocolate | Use a deeper dip for the Rolo |
| Tassel is too thick | Too much chocolate on toothpick | Wipe toothpick after every 3 caps |
| Sticky bases | Lack of parchment paper | Always use silicone or parchment |
Different Flavor Ideas
You can easily tweak the flavors to match a school's colors. For a white and blue theme, use white chocolate squares and blue tinted melted chocolate for the tassel.
If you're planning a bigger spread, these pair well with a Graduation Cake recipe for a full dessert table. For a larger crowd, I usually whip up a Graduation Sheet Cake to keep things simple.
Nut Free Option
Swap the peanut butter cups for mini marshmallows or small pieces of fudge. Just ensure the base is flat enough to hold the square.
White Chocolate Contrast
Use white chocolate for the squares and dark chocolate for the base. The contrast makes the "mortarboard" pop visually.
Adjusting the Batch Size
Scaling Down (1/2 batch): Use 8 of each candy. Since the surface area is smaller, you can likely reduce the chilling time to 45 minutes, but 60 is safer.
Scaling Up (4x batch): Work in batches of 16. If you crowd the tray, the caps will touch and fuse together. Increase your melted chocolate to 8 tbsp, but reheat it every 10 minutes to maintain the correct viscosity.
Debunking Chocolate Ideas
Some people think you need a double boiler for every chocolate project. For this recipe, the microwave is actually better because you only need a tiny amount of melted chocolate, and a double boiler is overkill.
Others believe that adding more melted chocolate makes the bond stronger. In reality, too much chocolate creates a "slip layer," making the Rolo slide off the square before it can set.
Storage and Waste
Fridge Storage: Keep them in an airtight container for up to 2 weeks.
Freezer Storage: These hold up for 2 months in the freezer. Just thaw them in the fridge to avoid condensation.
Zero Waste: Don't toss the leftover melted chocolate. Drizzle it over some fresh strawberries or dip a few pretzels to use up the last bit of the bowl.
Serving Suggestions
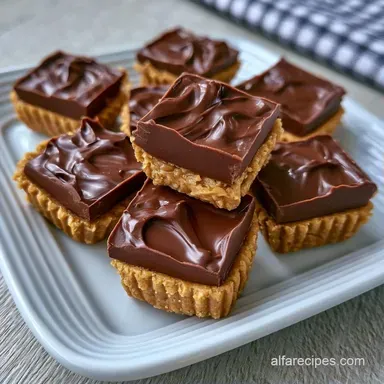
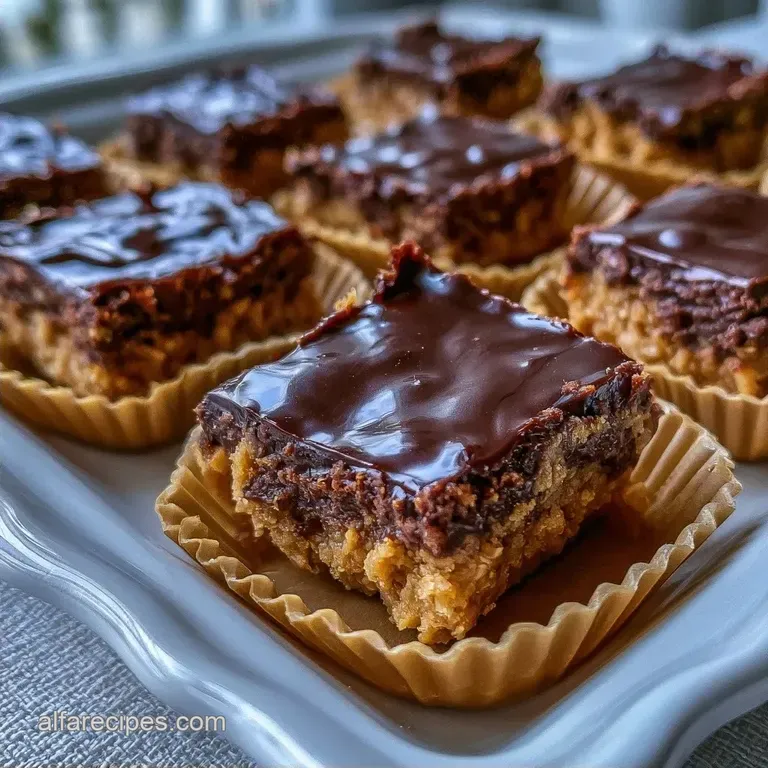
These Easy Chocolate Graduation Caps look best when piled on a white porcelain platter. This creates a high contrast background that makes the dark chocolate stand out.
For a more personal touch, place each cap in a small cupcake liner and tie it with a ribbon. This turns a simple treat into an individual favor that guests can take home without getting chocolate on their hands. This recipe works as a great addition to a celebration tray alongside fresh fruit and salty nuts.
Recipe FAQs
What are some inexpensive ideas for a graduation party?
Make these chocolate graduation caps. They use affordable store-bought candies and require no baking, keeping your budget low.
How to make my brother's graduation party unique and fun?
Serve a personalized dessert platter. Adding themed treats like these chocolate caps creates a festive, custom atmosphere without requiring professional catering.
Kids easy chocolate graduation caps?
Yes, they are ideal for children. Since there is no oven involved in the assembly, kids can safely help build the caps. If you enjoyed the simple process here, see how that same ease applies to our no knead pizza dough.
How to assemble the graduation caps?
Arrange mini peanut butter cups upside down on a parchment lined tray. Press a dark chocolate square on top and secure a Rolo in the center using melted dark chocolate.
How to create the tassel effect?
Drag a toothpick through melted dark chocolate. Move the toothpick from the center Rolo to the edge of the chocolate square to simulate a string.
How to store leftover caps?
Place them in an airtight container. They stay fresh for up to 2 weeks in the fridge or 2 months in the freezer.
Is it true these chocolate caps require baking to set?
No, this is a common misconception. These treats only need to be refrigerated for 60 minutes to ensure the chocolate bonds firmly.
Easy Chocolate Graduation Caps