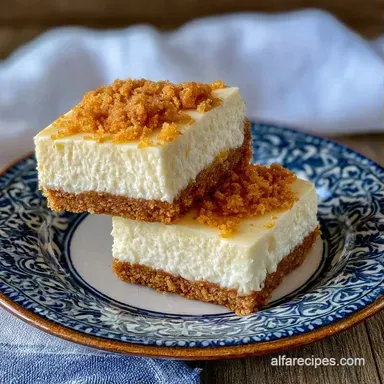
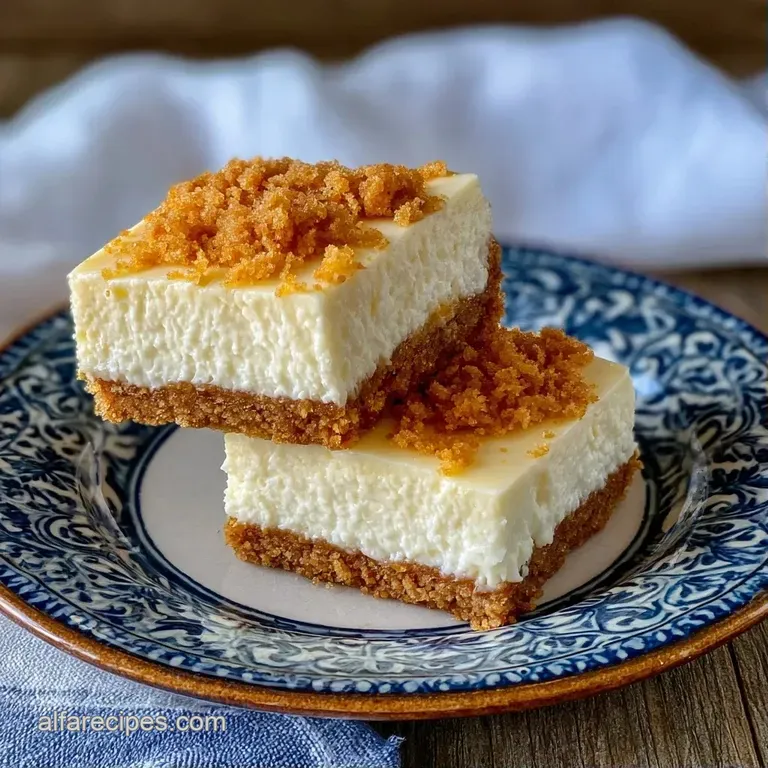
Father's Day Cream Cheese Bars: Dense and Rich

- Time: 20 min active + 4 hours chilling
- Flavor/Texture Hook: Tangy, rich filling with a toasted, salty crust
- Perfect for: Potlucks, holiday platters, or a fancy weekend treat
The smell of toasted graham crackers hitting 175°C is the first sign you're on the right track. For a long time, I thought every cheesecake style dessert required a water bath to prevent cracks.
I spent far too much time wrestling with aluminum foil and boiling water, only to realize that the shallow depth of a bar recipe changes the thermodynamics entirely.
You don't need the water bath here. Because the batter is spread thin in an 8x8 pan, the heat penetrates the center quickly without overcooking the edges. This makes these Cream Cheese Bars much faster to prep than a traditional cake.
If you're planning these as Fathers Day Cream Cheese Bars, the key is the contrast between the salt in the crust and the sugar in the filling. Expect a treat that is dense and creamy, not airy like a mousse.
Cream Cheese Bars: The Precision Guide
Getting the texture right comes down to how you handle the fats and proteins. Most people over beat the batter, which incorporates too much air and leads to a cracked surface.
Room Temperature Ingredients: Using cold cream cheese creates tiny lumps that won't disappear no matter how much you mix. Softening the cheese to 21°C allows the sugar to dissolve evenly.
Air Control: Once the egg enters the mix, the goal is integration, not aeration. Over mixing at this stage creates a soufflé effect that causes the bars to sink after they leave the oven.
If you enjoy this style of dense dessert, you might also like these no bake cheesecake cups for a faster version.
| Method | Bake Time | Texture | Best For |
|---|---|---|---|
| Oven Bake | 30 mins | Set and creamy | Classic stability |
| Stovetop (Crust) | 5 mins | Extra buttery | Quick prep |
What Each Ingredient Does
The ratio of fat to protein determines whether your bar holds its shape or turns into a puddle.
| Ingredient | What It Does | Best Swap |
|---|---|---|
| Cream Cheese (450g) | Provides structure and tang | Mascarpone (richer, less tangy) |
| Graham Crumbs (180g) | Creates a sturdy, absorbent base | Digestive biscuits (more salty) |
| Large Egg (50g) | Binds the filling together | 1/4 cup applesauce (denser, eggless) |
| Unsalted Butter (75g) | Glues the crust and adds flavor | Coconut oil (dairy-free) |
Tools For The Job
You'll need an 8x8 inch square pan. Using a larger pan will make the bars too thin, and they'll overcook before the center sets.
Parchment paper is a non negotiable here. I always leave a two inch overhang on the sides so I can lift the entire block out of the pan. This avoids the struggle of trying to slice them while they're still inside the tin.
A hand mixer or stand mixer such as a KitchenAid works best for the filling. You need enough power to smooth out the cream cheese without spending ten minutes doing it by hand.
Step-by-step Baking Process
- Preheat your oven to 350°F (175°C) and line an 8x8 inch square baking pan with parchment paper, leaving an overhang on the sides.
- Combine graham cracker crumbs, melted butter, sugar, and salt in a bowl.
- Press the mixture firmly into the bottom of the pan using the bottom of a measuring cup until evenly packed.
- Bake the crust for 8–10 minutes until it smells nutty and toasted, then set aside to cool slightly.
- Beat the softened cream cheese and sugar on medium high speed until the mixture is velvety and no lumps remain.
- Reduce speed to low and add the egg, vanilla, and salt.
- Mix only until just combined; stop as soon as the egg disappears to avoid adding too much air.
- Pour the filling over the pre baked crust and smooth the top with a spatula.
- Bake for 20–25 minutes until the edges are set and slightly puffed, but the center still has a slight jiggle.
- Remove from the oven and allow to cool to room temperature.
- Transfer the pan to the refrigerator for at least 4 hours (preferably overnight).
- Lift the bars out using the parchment paper sling and slice into 18 even squares using a warm knife.
Chef's Note: To get those clean, sharp edges, dip your knife in hot water and wipe it dry between every single cut.
Fixing Baking Issues
Most problems with these bars happen during the mixing or chilling phase. If the top is cracked, it usually means the oven was too hot or you beat the eggs too long.
Troubleshooting Common Issues
| Issue | Solution |
|---|---|
| Why Your Filling Cracked | Air bubbles expand in the heat and then burst. This happens if you whip the batter on high speed after adding the egg. Use a low setting for the final stage. |
| Why Your Crust Is Soggy | A raw crust absorbs moisture from the filling. Pre baking the crumbs for 10 minutes creates a barrier that keeps the base crisp. For more tips on crust stability, King Arthur Baking. |
Another version for Day Cream Cheese Bars involves topping the finished bars with fresh blueberries and a drizzle of honey.
Adjustment Guidelines
If you want to change the batch size, you have to adjust the pan and time.
Scaling Down (Half Batch): Use a 4x8 inch loaf pan. Reduce the baking time by about 20% and check for the "center jiggle" at 15 minutes. Since you can't easily halve an egg, beat one egg in a small bowl and use 25g.
Scaling Up (Double Batch): Use two 8x8 pans rather than one large sheet. If you use a larger pan, lower the temperature to 160°C and extend the bake time by 10-15 minutes. Increase salt and vanilla to 1.5x, but keep the baking powder (if using) the same.
- - Oven Temp
- Exactly 175°C.
- - Chill Time
- Minimum 4 hours.
- - Ratio
- 450g cream cheese to 100g sugar.
Decision Shortcut: - Want tangier? Add 1 tsp lemon juice. - Want richer? Use full fat Philadelphia cream cheese. - Want a crunchier base? Bake the crust for 12 mins instead of 10.
Storage and Waste Tips
Keep these Cream Cheese Bars in an airtight container in the fridge for up to 5 days. They actually taste better on day two as the flavors meld.
For the freezer, wrap each individual bar in parchment paper and place them in a freezer bag. They stay good for 3 months. Thaw them in the fridge overnight rather than on the counter to prevent condensation from making the crust soggy.
To avoid waste, save any leftover graham cracker crumbs by freezing them in a small jar. You can also use the leftover cream cheese from the tub to make a quick savory dip with garlic and chives for veggie sticks.
Serving and Plating
The presentation makes a huge difference for these bars. Instead of just piling them on a plate, arrange them in a staggered line on a slate board.
Fresh Berry Garnish: Top each square with a single raspberry or a slice of strawberry. The acidity of the fruit cuts through the richness of the cheese.
The Cafe Style Platter: Dust the top of the bars with a light coating of powdered sugar using a fine mesh sieve. Place a few mint leaves around the edges for a pop of color.
Warm Knife Trick: If the bars are sticking to the knife, run the blade under hot water for 5 seconds. This melts the fat slightly as you cut, resulting in a smooth, glossy side.
Recipe FAQs
Why did my cream cheese bar filling crack?
Over mixing the egg creates air bubbles. These bubbles expand in the heat and then burst, leaving cracks on the surface. Use a low speed for the final mixing stage to keep the batter dense.
How to prevent the crust from becoming soggy?
Pre-bake the crust for 8 10 minutes. This creates a toasted barrier that prevents the moist filling from soaking into the graham cracker crumbs.
Is it true I can just press the crust into the pan without baking it first?
No, this is a common misconception. Skipping the pre-bake step typically results in a soft, soggy base rather than a crisp, nutty crust.
How to store these bars to keep them fresh?
Place them in an airtight container in the refrigerator. They remain fresh for up to 5 days and often taste better on day two as the flavors meld.
Can I freeze cream cheese bars?
Yes, they stay good for 3 months. Wrap each bar individually in parchment paper and thaw them overnight in the fridge to prevent condensation from ruining the crust.
How to get perfectly clean squares when slicing?
Use a warm knife. Dip the blade in hot water and wipe it clean between each cut to ensure the filling doesn't stick to the metal.
How to avoid lumps in the filling?
Beat the softened cream cheese and sugar on medium high speed until velvety. If you enjoyed mastering this smooth texture here, see how a similar rich consistency is achieved in our classic southern chess pie.
Cream Cheese Bars