Father's Day Chocolate Brownies in 40 Minutes

- Time: 10 min active + 30 min baking
- Flavor/Texture Hook: Deep cocoa flavor with a fudgy, dense crumb
- Perfect for: High impact desserts or a thoughtful gift
- The Logic of Great Chocolate Brownies
- Why Most Brownies Turn Out Cakey
- Picking the Right Ingredients
- The Necessary Gear
- Mixing and Baking Steps
- Troubleshooting Your Bake
- Creative Flavor Twists
- Scaling Your Batch
- Myths About Baking
- Storage and Freshness
- Serving Your Brownies
- Recipe FAQs
- 📝 Recipe Card
The Logic of Great Chocolate Brownies
Why does the top of a brownie sometimes crack like a thin sheet of ice while others just look like chocolate cake? It comes down to how the sugar dissolves into the eggs. When you whisk them long enough, you create a stable structure that traps just enough air to lift the top without turning the whole thing into a sponge.
I used to just stir everything together and hope for the best, but the results were inconsistent. Once I started treating the batter as an emulsion rather than just a mix, the texture changed.
Whether you're making these for a casual night or prepping Fathers Day Chocolate Brownies, the precision in the mixing phase is what makes the difference.
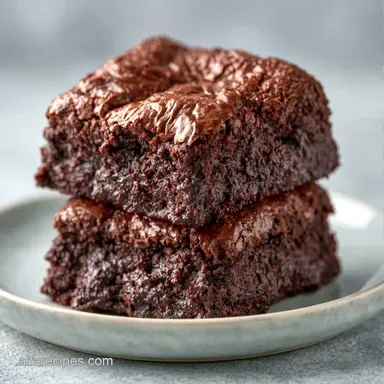
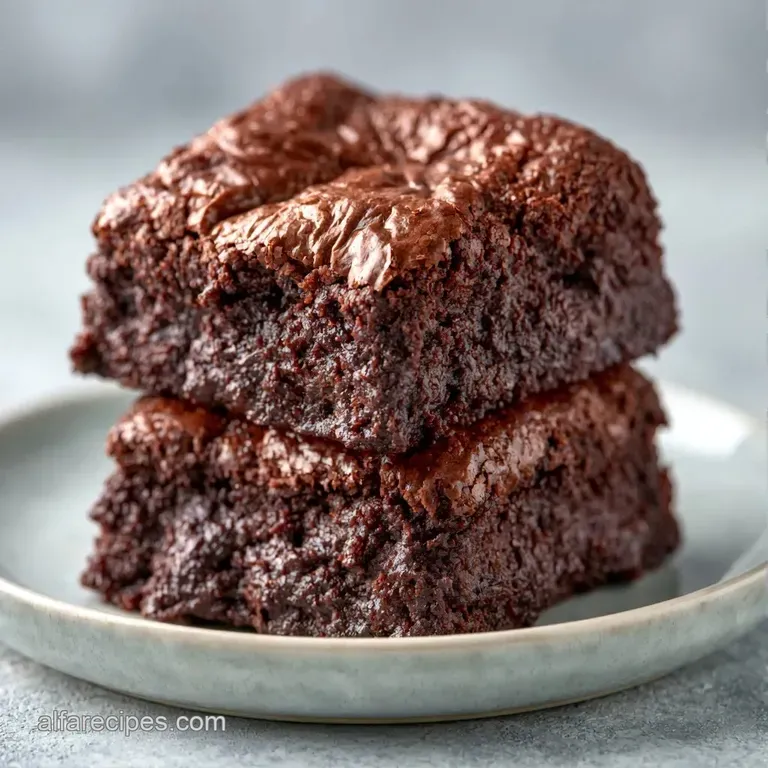
You can expect a rich, heavy dessert that holds its shape when sliced. We aren't aiming for a light crumb here. We want something that feels substantial and tastes like a concentrated piece of chocolate.
Why Most Brownies Turn Out Cakey
The main reason Chocolate Brownies lose their fudginess is too much flour or over mixing after the flour is added. When you stir too much, you develop gluten, which gives the dessert a bread like structure. To keep it dense, we fold the dry ingredients in gently.
Sugar Aeration: Whisking sugar and eggs creates a meringue like layer that settles into a glossy crust. Fat Ratio: Using a high volume of melted butter keeps the crumb tight and moist.
| Method | Time | Texture | Best For |
|---|---|---|---|
| Fast Mix | 20 min | Soft/Cakey | Quick cravings |
| Classic Ribbon | 30 min | Fudgy/Crackly | Special events |
Picking the Right Ingredients
What Each Ingredient Does
| Ingredient | What It Does | Best Swap |
|---|---|---|
| Unsalted Butter | Provides moisture and richness | Coconut oil (adds nuttiness) |
| Cocoa Powder | Concentrates the chocolate flavor | Melted dark chocolate (richer) |
| Large Eggs | Binds and creates the lift | Flax eggs (denser, nuttier) |
| Granulated Sugar | Creates the crackly top | Brown sugar (chewier) |
Gathering Your Essentials
- 1 cup unsalted butter, melted Why this? Pure fat for a fudgy mouthfeel
- 2 cups granulated sugar Why this? Essential for the thin crust
- 4 large eggs Why this? Structure and emulsification
- 2 tsp vanilla extract Why this? Rounds out the bitterness of cocoa
- 3/4 cup unsweetened cocoa powder Why this? Deep, dark chocolate base
- 1 cup all purpose flour Why this? Minimal gluten for a dense bite
- 1/2 tsp salt Why this? Balances the sugar
- 1 cup semi sweet chocolate chips Why this? Adds pockets of melted chocolate
The Necessary Gear
You don't need a professional kitchen, but a few specific tools make this easier. A 9x13-inch baking pan is the standard for this volume. Line it with parchment paper, leaving an overhang on the sides so you can lift the whole block out later.
A large mixing bowl and a whisk are non negotiable. I prefer a silicone spatula for the folding stage because it scrapes the sides efficiently without over working the batter. If you have a stand mixer such as KitchenAid, it makes the whisking phase much faster.
Mixing and Baking Steps
The Batter
The Chocolate Base
Preheat your oven to 350°F (175°C). Line your pan with parchment. Melt the butter and whisk in the cocoa powder until the mixture is smooth and glossy.
Creating the Emulsion
Add the sugar, eggs, and vanilla. Whisk vigorously for 2–3 minutes. If you stop whipping and lift the beaters or whisk attachment up out of the bowl, the mixture should fall in a continuous ribbon, as explained by King Arthur Baking. The batter should look slightly pale and thick.
The Final Fold
Sift in the flour and salt. Use your spatula to gently fold the dry ingredients into the wet batter. Stop the moment no white streaks remain. Fold in the chocolate chips last.
The Bake and Cool
Pour the batter into the pan and smooth the top. Bake for 25–30 minutes until the edges are set and a toothpick comes out with a few moist crumbs. Don't overbake, or you'll lose the fudge factor.
Troubleshooting Your Bake
Getting Chocolate Brownies right usually comes down to temperature and timing. If the center feels too liquid, it needs another 3 minutes. If it's dry, you've gone too far.
If Brownies Are Dry
This usually happens when the oven runs hot or the bake time is too long. The proteins in the egg tighten too much, squeezing out the moisture.
If the Top Failed
A lack of a crackly top usually means the sugar wasn't whisked enough with the eggs. The sugar needs to partially dissolve to create that same day Chocolate Brownies gloss.
| Problem | Root Cause | Solution |
|---|---|---|
| Cakey Texture | Too much flour/over mixing | Use a scale for flour, fold gently |
| Greasy Top | Butter too hot when adding eggs | Let butter cool slightly |
| Sunken Middle | Underbaked or too many eggs | Bake 5 mins longer; check egg size |
Creative Flavor Twists
If you want something more fudge like, my Chocolate Fudge Brownies use a different fat ratio to increase the density. But for this base, you can easily swap things around.
Salty Sweet Twist
Sprinkle flaky sea salt on top immediately after taking the pan out of the oven. It cuts through the sugar and makes the cocoa pop.
Coffee Infused Punch
Add a teaspoon of instant espresso powder to the melted butter. You won't taste the coffee, but it makes the chocolate taste more intense.
Gluten free Version
Swap the all purpose flour for a 1:1 gluten-free blend. The texture remains quite similar because we aren't relying on a high rise anyway.
Dairy free Alternative
Use melted coconut oil instead of butter. Note that this can make the brownies slightly oilier, so keep an eye on the bake time.
Scaling Your Batch
When you need to make a larger batch of Chocolate Brownies, don't just double everything blindly.
Scaling Down (Half Batch): Use an 8x8-inch pan. Reduce the baking time by about 20%. Since you can't easily halve an egg, beat one egg in a small bowl and use half of the liquid.
Scaling Up (Double Batch): Work in batches if your bowl is too small. For the oven, lower the temperature to 325°F (160°C) and extend the time by 10-15 minutes to ensure the center cooks without burning the edges.
| Batch Size | Pan Size | Temp Change | Time Adjustment |
|---|---|---|---|
| 1/2 Batch | 8x8 inch | None | -5 to 7 mins |
| Full Batch | 9x13 inch | None | Base time |
| 2x Batch | Two 9x13 | -25°F | +10 mins |
Myths About Baking
Some people think that adding more flour makes the brownies "sturdier." In reality, it just makes them cakey. The stability comes from the eggs and the cooling process.
Another myth is that you should use a toothpick to find a "clean" center. For Chocolate Brownies, a clean toothpick means they are overbaked. You want a few moist crumbs clinging to the wood.
Storage and Freshness
Store your Chocolate Brownies in an airtight container at room temperature for 3 days. If you prefer a denser, almost truffle like texture, keep them in the fridge for up to a week.
For long term storage, wrap individual squares in parchment and freeze them for 3 months. These Day Chocolate Brownies thaw quickly; just let them sit for 20 minutes or pop them in the microwave for 10 seconds.
To avoid waste, if you have a few leftover scraps of brownie, crumble them over vanilla ice cream or fold them into a cheesecake batter.
Serving Your Brownies
The trick to clean cuts is patience. Let the pan cool completely before lifting the parchment. If you're in a rush, put the pan in the fridge for 30 minutes.
Once cooled, use a sharp knife and wipe it clean with a damp cloth between every single cut. This prevents the chocolate from dragging and gives you those sharp, professional edges.
These homemade Chocolate Brownies look great on a platter with fresh raspberries or a dollop of whipped cream. Because they are so rich, a small square is usually enough. These Chocolate Brownies provide a satisfying end to any meal.
Recipe FAQs
Are chocolate brownies a good dessert for Father's Day or Valentine's Day?
Yes, they are a crowd pleasing choice. Their rich flavor and easy sharing make them perfect for holidays. If you enjoy this style of treat, you might also like the buttery richness in our classic Southern chess pie.
How to achieve the ribbon stage when whisking the batter?
Whisk the sugar, eggs, and vanilla vigorously for 2 3 minutes. The batter is ready when it becomes slightly pale, thick, and leaves a visible trail on the surface when the whisk is lifted.
Can I store these brownies in the refrigerator?
Yes, for up to one week. Refrigerating them creates a denser, truffle like texture compared to storing them at room temperature.
Is it true that brownies must be baked at 400°F for a fudgy texture?
No, this is a common misconception. Baking at 350°F ensures the edges don't burn while the center sets perfectly.
What should I do if the center of the brownies feels too liquid after 30 minutes?
Bake them for another 3 minutes. Check the center again to ensure it has set without becoming dry.
How to freeze brownie squares for long term storage?
Wrap individual squares in parchment paper. Store them in an airtight container for up to 3 months.
Can I use leftover brownie scraps for other desserts?
Yes, crumble them over vanilla ice cream. You can also fold the pieces into a cheesecake batter to avoid waste.
Chocolate Brownies For Father S Day