College Color Velvet Cake: Tender and Vibrant
- Time: 20 min active + 40 min baking
- Flavor/Texture Hook: Tangy, smooth, and deeply pigmented
- Perfect for: Graduation parties and alumni events
- College Color Velvet Cake
- Why This Recipe Works
- Ingredient Role Breakdown
- Shopping List and Swaps
- Essential Baking Tools
- Bringing It Together
- Troubleshooting Common Issues
- Customizing Your Cake
- Scaling the Recipe
- Debunking Baking Myths
- Storage and Waste Tips
- Final Presentation Ideas
- Recipe FAQs
- 📝 Recipe Card
That smell of cocoa and vinegar hitting the warm oven air is unmistakable. It's a sharp, sweet scent that tells you the chemistry is working. I remember making this for a friend's grad party, and we spent way too long arguing over whether the blue was "university blue" or "sky blue," but the moment we sliced into it, the color was so saturated it looked like it belonged in a magazine.
The goal here is a crumb that's barely there, almost like you're eating a cloud of colored sugar. This isn't your standard sponge cake. It's specifically designed to be a College Color Velvet Cake, meaning it has to hold a massive amount of pigment without losing its structural integrity or tasting like a bottle of dye.
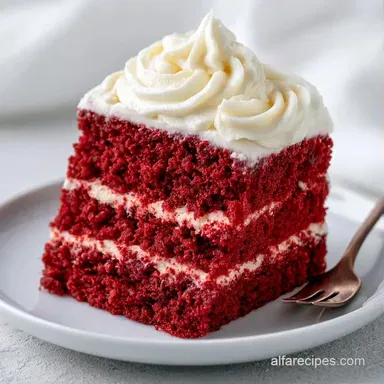
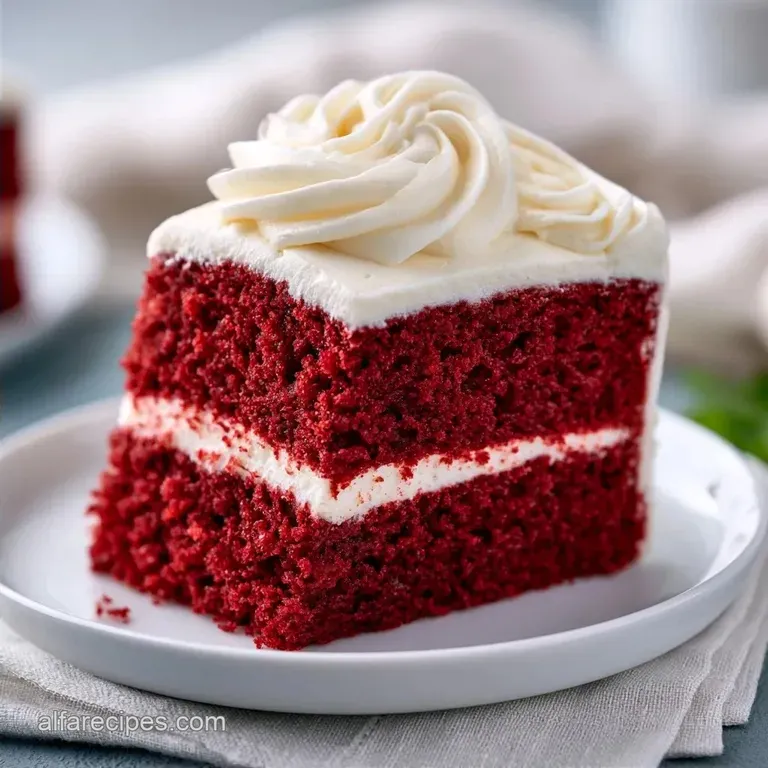
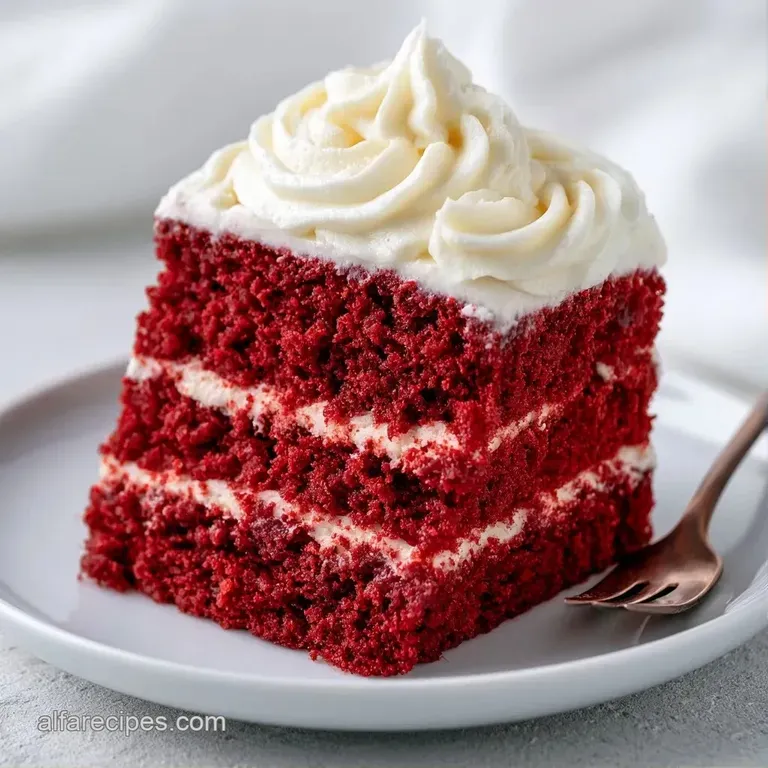
You can expect a rich, moist layer that pairs perfectly with a tangy cream cheese frosting. We're aiming for that specific "velvet" feel, which comes from the interaction of the oil and the buttermilk. It's a bit more indulgent than a standard cake, but that's exactly why it works for a celebration.
College Color Velvet Cake
The beauty of this recipe is that it doesn't rely on guesswork. We're using a specific set of ratios to make sure the cake rises evenly and the color doesn't fade during the bake. If you're used to traditional red velvet, this is a similar beast, but the gel coloring allows you to pivot to any school color without adding too much liquid to the batter.
Right then, let's talk about the specifics. You'll be using three 8 inch pans to get that classic tiered look. It's a lot of frosting, but trust me, the tanginess of the cream cheese is the only thing that cuts through the sweetness of the cake. If you're feeding a massive crowd, my graduation sheet cake is a faster way to get the same flavor profile in a single pan.
Why This Recipe Works
- Buttermilk and Vinegar: The acid in these ingredients breaks down the gluten in the flour. This creates a tender, tight crumb instead of a chewy one.
- Vegetable Oil: Unlike butter, oil remains liquid at room temperature. This keeps the cake moist for days and gives it that specific "velvet" mouthfeel.
- Gel Coloring: Gel is more concentrated than liquid dye. It allows us to hit deep, saturated colors without thinning out the batter and ruining the rise.
Bake Method Comparison
| Method | Time | Texture | Best For |
|---|---|---|---|
| Classic Tiered | 60 mins | Light and airy | Formal parties |
| Sheet Cake | 45 mins | Denser, moist | Casual crowds |
| Cupcakes | 22 mins | Springy | Easy serving |
Ingredient Role Breakdown
Understanding why we use these specific items helps you avoid mistakes. According to King Arthur Baking, the acidity in buttermilk is essential for reacting with baking soda to create lift.
| Ingredient | What It Does | Best Swap |
|---|---|---|
| Buttermilk | Tenderizes crumb and adds tang | 1 cup milk + 1 tbsp lemon juice |
| Vegetable Oil | Ensures lasting moisture | Melted coconut oil |
| Gel Food Color | Provides high saturation pigment | high-quality paste color |
| Cream Cheese | Provides stability and tartness | Mascarpone (richer, less tart) |
Shopping List and Swaps
Grab these exact items for the best result. I've found that using a lower fat cream cheese makes the frosting too runny, so stick to the full fat version.
For the Cake: 2.5 cups all purpose flour Why this? Balanced protein for a stable rise 1.5 cups granulated sugar 1 tsp baking soda 1 tsp salt 2 tbsp unsweetened cocoa powder Why this? Adds depth and reacts with acid 1 cup buttermilk 2 large
Eggs 1.5 cups vegetable oil 1 tsp distilled white vinegar 2 tsp vanilla extract 2 tsp gel food coloring Why this? Prevents batter thinning
For the Frosting: 1 lb full fat cream cheese Why this? Essential for frosting structure 0.5 cup unsalted butter 4 cups powdered sugar 1 tsp vanilla extract 1 pinch salt
Essential Baking Tools
You don't need a professional kitchen, but a few things make this way easier. I use a stand mixer such as a KitchenAid for the frosting, but a handheld mixer works fine too.
- Three 8 inch round cake pans
- Parchment paper (don't skip this or the cakes might stick)
- Fine mesh sieve for sifting dry ingredients
- Large mixing bowls
- Offset spatula for smoothing the frosting
- Wire cooling racks
Bringing It Together
Let's get into the actual process. The most important part is not overmixing. Once the flour hits the wet ingredients, stop as soon as the streaks disappear. Overmixing develops too much gluten, and you'll end up with a tough cake instead of a velvety one.
Phase 1: Prepping the Base
Preheat your oven to 350°F (175°C). Grease three 8 inch round cake pans and line the bottoms with parchment paper. Sift together the all purpose flour, granulated sugar, baking soda, salt, and cocoa powder in a large bowl. Sifting is key here because cocoa powder loves to clump.
Phase 2: Mixing the Wet Ingredients
In a separate bowl, whisk the vegetable oil, buttermilk, eggs, vinegar, and vanilla extract. Keep whisking until the mixture is smooth and the oil is fully integrated.
Phase 3: Adding the College Spirit
Slowly pour the wet ingredients into the dry ingredients. Stir with a spatula just until combined. Now, stir in your gel food coloring. Keep adding it until the batter is a deep, uniform color. Remember, the color will darken slightly in the oven.
Phase 4: The Bake and Cool
Divide the batter evenly between the three pans. Bake for 40 minutes until a toothpick inserted into the center comes out clean. Let them cool in the pans for 10 minutes before flipping them onto wire racks. They must be completely cold before frosting.
Phase 5: Finishing with Frosting
Beat the softened cream cheese and unsalted butter together until smooth. Gradually mix in the sifted powdered sugar, vanilla, and salt. Beat the mixture until it is silky and fluffy. Frost the cooled layers, starting with a thin crumb coat to lock in the crumbs.
Chef Note: If your frosting feels too soft, pop it in the fridge for 15 minutes. It should be spreadable but hold its shape when you swirl it.
- 1. Temp
- Oven must be exactly 175°C (350°F).
- 2. Time
- Check the cakes at exactly 40 minutes.
- 3. Weight
- Use a full 1 lb (453g) of cream cheese for the correct frosting consistency.
Troubleshooting Common Issues
Even with a precise recipe, things happen. Usually, it's a temperature issue or a mixing error.
| Issue | Solution |
|---|---|
| Why Your Cake Sunk in the Middle | This usually happens if the oven door was opened too early or the baking soda is old. The structure collapses before it sets. |
| Why Your Frosting is Grainy | This is almost always caused by cold butter or cream cheese. They need to be truly softened to room temperature to bond with the sugar. |
| Why the Color Looked Dull | If you used liquid coloring instead of gel, the extra water can dilute the pigment and affect the rise. |
Customizing Your Cake
This College Color Velvet Cake is a blank canvas. Once you have the base down, you can tweak it to fit the specific vibe of your event.
For a Pure White Velvet Cake Skip the cocoa powder and the gel coloring. Increase the vanilla to 1 tablespoon for a rich, buttery flavor. This creates a clean, elegant look that's great for weddings or winter graduations.
For an Original Red Velvet Twist Use red gel coloring and keep the cocoa powder. Red velvet is essentially the ancestor of this recipe, relying on the same acid base reaction for its texture.
For a Lighter Frosting Fold in a cup of whipped cream or stiff peak meringue into the cream cheese mixture. It makes the frosting airier and less sugary.
Decision Shortcut:Want more vivid color? Use a high concentration gel paste. Need a flatter top? Don't overbeat the eggs in the wet mix. Short on time? Bake in one 9x13 pan but add 10 minutes to the bake time.
If you're looking for more ideas, these graduation cake pops are a great way to use the same batter for a handheld treat.
Scaling the Recipe
When you need to change the size of this College Color Velvet Cake, you can't just multiply everything blindly.
Scaling Down (½ batch): Use two 6 inch pans. Reduce the bake time by about 20% and start checking at 30 minutes. Since you can't easily split an egg, beat one egg in a bowl and use half of the liquid.
Scaling Up (2x batch): Work in batches if your mixer is small. Lower the oven temperature by about 15°C (25°F) and extend the bake time. I recommend increasing the salt and cocoa only by 1.5x to avoid overpowering the flavor.
Debunking Baking Myths
You'll hear a lot of advice that doesn't actually hold up under a scientific lens.
Myth: Room temperature eggs make a difference. Truth: While they incorporate more easily, the difference in the final crumb is negligible. Just make sure they aren't ice cold if you're using a butter based cream.
Myth: More food coloring makes the cake rise less. Truth: Only if you use liquid dye. Gel coloring has so little water that it doesn't affect the chemistry of the rise at all.
Myth: You must use cocoa powder for "velvet" texture. Truth: The cocoa provides flavor and a slight acidic boost, but the "velvet" feel actually comes from the oil and buttermilk.
Storage and Waste Tips
This cake keeps remarkably well because of the oil. Store the frosted cake in an airtight container in the fridge for up to 5 days. Because of the cream cheese, it's not safe to leave on the counter for more than 4 hours.
Freezing Guide: You can freeze the unfrosted layers. Wrap them tightly in plastic wrap and then foil. They'll stay fresh for 3 months. Thaw them in the fridge overnight before frosting.
Zero Waste Ideas: If you have leftover cake scraps from leveling the tops, don't toss them. Crumble them up, mix with a spoonful of frosting, and roll them into cake pops. You can also freeze leftover frosting in small portions for cupcakes later.
Final Presentation Ideas
To make your College Color Velvet Cake look professional, focus on the edges. Use a bench scraper to get those sharp, clean sides.
For a high impact look, create a "drip" effect using a white chocolate ganache dyed in a contrasting school color. If you want something more subtle, use a piping bag to add small stars of frosting around the top edge.
If you're serving this at a party, pair it with fresh berries. The acidity of raspberries or blueberries complements the tang of the cream cheese and the richness of the velvet crumb. It's a simple way to make the plate look more sophisticated without adding more work to the baking process.
Recipe FAQs
What color is velvet cake?
Any saturated color of your choice. While traditional velvet cakes are red, this recipe uses gel food coloring to match specific college colors or themes.
How to get a velvet look on a cake?
Sift dry ingredients and use gel food coloring. Sifting the flour and cocoa powder prevents clumps for a smooth crumb, while gel colors provide deep, uniform saturation.
Why did my velvet cake sink in the middle?
The structure likely collapsed during baking. This typically occurs if the oven door is opened too early or if the baking soda has lost its potency.
How to fix grainy cream cheese frosting?
Beat softened butter and cream cheese together before adding sugar. Ensure both are at room temperature to bond properly. For more party ready treats, see these graduation cupcakes.
Is it true that liquid food coloring works as well as gel?
No, this is a common misconception. Liquid coloring introduces extra water into the batter, which often results in a duller, less vibrant color.
How long can I keep the cake on the counter?
No more than 4 hours. Because the frosting is made with cream cheese, it requires refrigeration to remain safe for consumption.
Can I freeze the cake layers?
Yes, unfrosted layers freeze well. Wrap them tightly in plastic wrap and foil for up to 3 months, then thaw in the fridge overnight before frosting.
College Color Velvet Cake