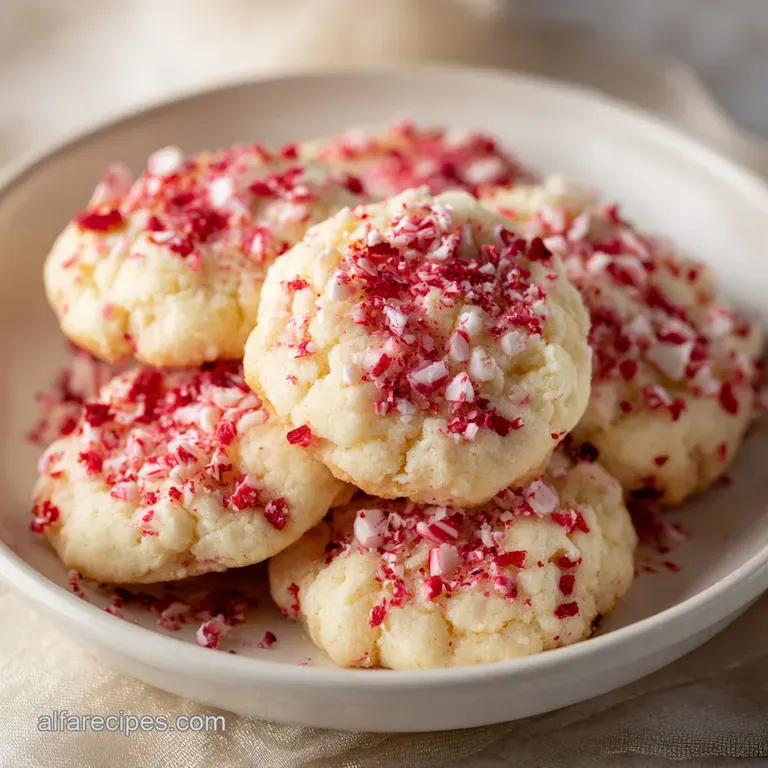
Peppermint Meltaway Cookies: Silky and Velvety
- Time:15 minutes active + 1 hour chilling = Total 85 minutes
- Flavor/Texture Hook: Silky, melt in-the mouth texture with a sharp peppermint shatter
- Perfect for: Holiday cookie platters or a precise baking project for beginners
- The Secret to Perfect Peppermint Meltaway Cookies
- Baking Specs and Timing Windows
- Ingredient Roles and Texture Secrets
- The Essential Baking Toolkit
- Step by Step Baking Guide
- Fixing Common Texture Issues
- Adjusting for Different Diets
- Keeping Your Cookies Fresh
- Perfect Pairings and Serving Ideas
- Recipe FAQs
- 📝 Recipe Card
The Secret to Perfect Peppermint Meltaway Cookies
That first crack of a peppermint candy cane is the only way to start this process. I remember the first time I tried a "meltaway" that wasn't actually a meltaway. They were basically just stiff sugar cookies - dry, crumbly, and they stayed in one piece far too long.
They lacked that specific, ethereal quality where the cookie vanishes the second it hits your tongue, leaving only a cool, minty breeze behind.
The real problem most home cooks face with these is the "cookie puddle" effect. You put a neat little ball of dough in the oven, and five minutes later, you have a flat, browned disc. That happens because the butter is too warm or the flour structure is too weak. This recipe is the targeted fix for that.
We use a combination of cornstarch for structure and a strict refrigeration window to ensure the cookies hold their height.
You can expect a cookie that stays pale, looks professional, and has a texture that feels more like a cloud than a biscuit. We're focusing on precision here, because in baking, a few degrees or ten extra minutes of chilling make the difference between a masterpiece and a mess.
Baking Specs and Timing Windows
Precision is everything when you're aiming for a "meltaway" texture. If the oven is too hot, the outside browns before the center sets, and you lose that signature pale look. If you skip the chill, the butter melts faster than the starches can set, leading to those dreaded flat cookies.
For this recipe, we are targeting a specific window of 8 to 10 minutes. Any longer and you'll start to see golden edges, which is actually a sign that you've overbaked a meltaway. We want the bottoms to be just barely golden while the tops remain a pristine, creamy white.
Below is a comparison of how different oven settings affect the outcome of these specific cookies.
| Method | Time | Texture | Best For |
|---|---|---|---|
| Standard Oven | 10 min | Uniform, soft | Consistent results |
| Convection Oven | 8 min | Slightly crisper edges | Larger batches |
| Toaster Oven | 9 min | Variable browning | Small test batches |
Ingredient Roles and Texture Secrets
The magic here isn't just in the flavor, it's in the ratios. We're essentially manipulating the gluten to ensure the cookie doesn't become "bread like." By replacing a large portion of the flour with cornstarch, we interfere with the protein bonds, creating a tender, fragile crumb.
Starch Interference: Cornstarch reduces the amount of gluten formed, which is why these cookies feel silky rather than chewy.
Moisture Control: Sweetened condensed milk provides sugar and fat in a stable, evaporated form, preventing the dough from becoming too wet.
Temperature Stability: Cold butter ensures the fat stays in tiny droplets, creating small air pockets that lead to that "melting" sensation. This is similar to the logic used in a shortbread cookies recipe, where fat content is king.
Flavor Volatility: Peppermint extract is potent and can evaporate if exposed to high heat for too long, which is why we keep the bake time short.
| Ingredient | Science Role | Pro Secret |
|---|---|---|
| Cornstarch | Gluten Inhibitor | Sift with flour to avoid "chalky" pockets |
| Condensed Milk | Texture Stabilizer | Use full fat for a more velvety mouthfeel |
| Powdered Sugar | Fine Grain Sweetener | Ensures the glaze is silky, not grainy |
| Butter | Fat Structure | Must be softened, not melted, to hold air |
The Essential Baking Toolkit
You don't need a professional kitchen, but a few specific tools make this a foolproof process. A digital scale is your best friend here; measuring flour by the cup can lead to packing too much into the measure, which makes the cookies heavy and "cakey" instead of light.
A fine mesh sifter is mandatory. If you have clumps of cornstarch or salt, you'll see them as white spots in the finished cookie. Using a piping bag for the glaze isn't strictly necessary, but it prevents the glaze from running off the edges, keeping that clean, professional look.
Finally,, use heavy duty parchment paper. These cookies have a high sugar and fat content, meaning they can stick to "greased" pans. Parchment creates a non stick barrier that allows for the cleanest release once they've cooled.
Step by step Baking Guide

Right then, let's get into the actual process. Trust me on the chilling step - it's the one thing you cannot skip if you want that perfect shape.
- Cream the softened butter and sweetened condensed milk. Mix until the mixture is pale and fluffyNote: this incorporates air for a lighter lift, then stir in the 1/4 tsp peppermint extract.
- Sift together the all purpose flour, cornstarch, and salt. Gradually incorporate these dry ingredients into the butter mixture until a soft, cohesive dough forms.
- Wrap the dough tightly in plastic wrap. Flatten it into a disk and refrigerate for at least 1 hour Note: this solidifies the fat to prevent spreading.
- Preheat the oven to 350°F (175°C). Line your baking sheets with parchment paper.
- Roll the chilled dough into 1 inch balls. Place them on the sheets and bake for 8-10 minutes until the bottoms are barely golden.
- Transfer the cookies to a wire rack. Allow them to cool completely Note: glazing a warm cookie will cause the frosting to melt and slide.
- Whisk together the powdered sugar, milk, and 1/4 tsp peppermint extract until the glaze is smooth and velvety.
- Pipe a small dollop of glaze onto each cooled cookie. Immediately sprinkle with the 2 oz of finely crushed peppermint candies.
Chef's Tip: For an even more precise finish, use a small cookie scoop to ensure every ball is exactly 1 inch. Consistent size means consistent baking times.
Fixing Common Texture Issues
Even with a precise recipe, things can go sideways. Most issues with peppermint meltaways come down to temperature. If your kitchen is too warm, the dough can soften while you're rolling the balls, which ruins the chilling work you did earlier.
Why Your Cookies Spread Too Much
This usually happens if the butter was too soft during creaming or the dough didn't chill long enough. When the fat melts too quickly in the oven, the cookie collapses before the starch can set.
| Problem | Root Cause | Solution |
|---|---|---|
| Flat Cookies | Insufficient chilling | Chill dough for an extra 30 mins |
| Browned Tops | Oven temp too high | Use an oven thermometer to verify 350°F |
| Grainy Glaze | Not enough milk | Add milk 1/2 tsp at a time until smooth |
Avoiding the "Cakey" Texture
If your cookies feel more like miniature cakes than meltaways, you've likely over mixed the dough. Once the flour goes in, stop mixing as soon as the streaks disappear. Over mixing develops gluten, which creates a chewiness that kills the "melt" effect.
Common Mistakes Checklist
- ✓ Use a scale for flour to avoid over packing
- ✓ Chill the dough disk for at least 60 full minutes
- ✓ Keep the oven temp strictly at 350°F
- ✓ Remove cookies while tops are still pale
- ✓ Let cookies cool completely before glazing
Adjusting for Different Diets
You can adapt this recipe for different needs, but be aware that altering the fat or starch ratios will change that signature "meltaway" feel. If you're looking for other holiday treats, my chocolate chip cookies are a great contrast to these minty bites.
Creating a gluten-free Version
To make these gluten-free, swap the all purpose flour for a high-quality 1:1 gluten-free flour blend that contains xanthan gum. Note: The texture will be slightly more fragile, so be extra gentle when moving them to the cooling rack.
Reducing the Sugar
You can reduce the powdered sugar in the glaze by about 20%, but don't reduce the sweetened condensed milk in the dough. That milk provides the structural binding and moisture that makes the cookie work.
Decision Shortcut for Customization If you want a stronger mint flavor, add an extra 1/8 tsp of extract to the dough. If you want a crispier edge, bake for exactly 11 minutes. If you want a softer center, pull them at 8 minutes.
Keeping Your Cookies Fresh
Because of the high fat content and the glaze, these cookies can get sticky if left in a humid room. Storage is key to maintaining that "shatter" of the peppermint candy.
Store the cookies in an airtight container with parchment paper layered between each row. In the fridge, they'll stay fresh for up to 5 days. If you prefer them room temperature, 3 days is the limit before the glaze starts to absorb moisture from the air and become tacky.
For freezing, freeze the unbaked 1 inch dough balls on a tray first, then transfer them to a freezer bag. They'll last 3 months. When you're ready, just bake them straight from the freezer, adding 1-2 minutes to the bake time.
To avoid waste, any leftover glaze can be stored in a small jar in the fridge for a week. Use it to drizzle over brownies or a slice of pound cake.
Perfect Pairings and Serving Ideas
These cookies are intense, so they pair best with drinks that cleanse the palate. A strong, dark roast coffee provides a bitter contrast to the sweet peppermint glaze. If you're serving them at a party, a glass of cold almond milk is the classic choice.
For a full holiday spread, I like to pair these with something salty, like roasted nuts or a sharp cheddar cheese platter. The salt cuts through the richness of the sweetened condensed milk and makes the peppermint pop.
If you're arranging a cookie box, place these next to a lemon shortbread or a ginger snap. The brightness of the lemon or the spice of the ginger complements the cool mint without overwhelming the senses.
Recipe FAQs
How to store these cookies to keep them fresh?
Store them in an airtight container at room temperature. They will maintain their soft, meltaway texture for 3 to 5 days.
Why must the dough be refrigerated for an hour?
To prevent excessive spreading. Chilling firms the butter, which is essential for maintaining the thick, round shape during baking.
Can these cookies be made without eggs?
Yes, they are naturally eggless. If you enjoyed the texture of these treats, see how the same structural principles work in our eggless cookie recipe.
Is it true that cornstarch can be substituted with all-purpose flour?
No, this is a common misconception. Cornstarch is required to create the signature tender, dissolving texture that all-purpose flour alone cannot produce.
How to know when the cookies are perfectly baked?
Look for barely golden bottoms. Bake at 350°F for 8-10 minutes, ensuring the tops remain pale to avoid drying them out.
Can I use regular milk instead of sweetened condensed milk in the dough?
No, the dough will be too thin. Sweetened condensed milk provides the specific binding properties and sweetness necessary for this recipe's structure.
How to apply the peppermint glaze and topping?
Whisk powdered sugar, milk, and peppermint extract until smooth. Pipe a small dollop onto completely cooled cookies and immediately sprinkle with crushed peppermint candy canes.
Peppermint Meltaway Cookies

