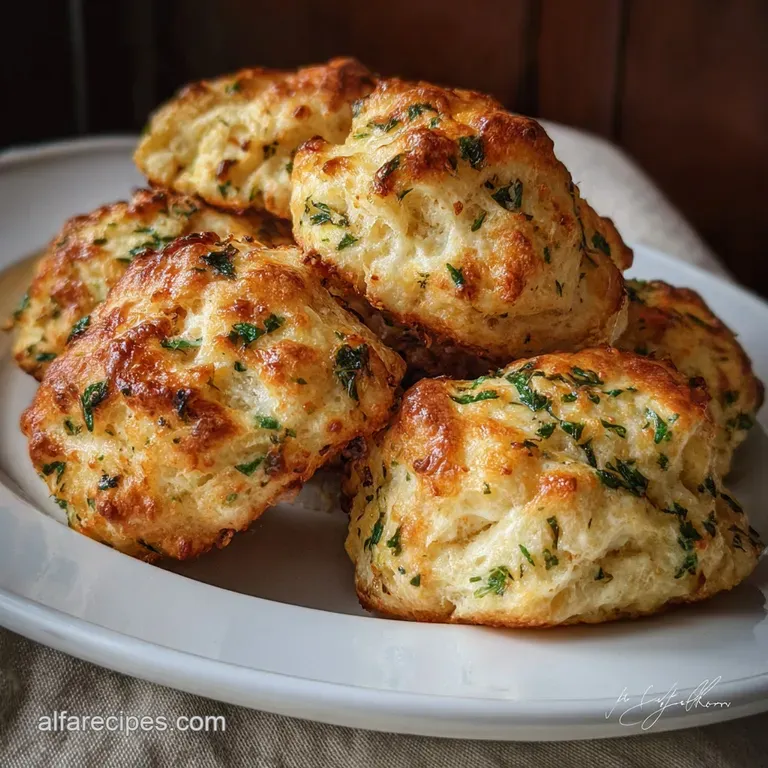
Can Biscuit Recipe with Garlic and Herbs
- Time: Active 10 mins, Passive 15 mins, Total 25 mins
- Flavor/Texture Hook: Flaky, buttery layers with a crisp garlic herb shatter
- Perfect for: Busy weeknight dinners or a crowded holiday table
- The Best Can Biscuit Recipe with Garlic and Herbs
- Why These Biscuits Taste So Good
- Key Specs for Your Biscuit Bake
- Breaking Down the Savory Ingredient Science
- Essential Tools for the Perfect Crunch
- Step-by-Step Guide to Golden Biscuits
- Solving Common Garlic Biscuit Flaws
- Tasty Swaps for Savory Herb Biscuits
- Storing and Reviving Your Leftover Biscuits
- Perfect Dishes to Serve Alongside Biscuits
- Recipe FAQs
- 📝 Recipe Card
The Best Can Biscuit Recipe with Garlic and Herbs
I’ll never forget the rainy Tuesday when dinner was falling apart, the kids were starving, and I had exactly zero energy to knead dough. I found a stray can of biscuits in the back of the fridge and realized that with enough garlic and butter, anything is possible.
The kitchen soon filled with that sharp, toasted aroma that brings everyone running to the table.
This can biscuit recipe with garlic and herbs creates an effortlessly flavorful side. It bridges the gap between "I’m too tired to cook" and "I want something hearty and special." We aren't just baking dough; we are transforming a basic grocery staple into something that feels like a warm hug from a professional baker.
You don’t need fancy equipment or hours of patience to get these results. It’s all about how you treat the butter and when you add the aromatics to ensure the garlic stays sweet rather than bitter. Let's get into the nitty gritty of how to make these the star of your next family meal.
Why These Biscuits Taste So Good
The Steam Engine: The high water content in refrigerated dough turns into steam rapidly in a hot oven, forcing the pre cut layers to expand and separate.
Fat Saturation: Brushing the dough before and after baking ensures the fat seeps into every crevice, creating a velvety mouthfeel.
Aromatic Layering: Using both fresh garlic and garlic powder provides a hit of immediate pungency and a deep, toasted background note.
| Method | Time | Texture | Best For |
|---|---|---|---|
| Conventional Oven | 15 minutes | Maximum lift and flaky separation | Traditional family dinners |
| Cast Iron Stovetop | 20 minutes | Dense, fried bottom crunch | Camping or rustic breakfasts |
| Air Fryer | 10 minutes | Intense exterior shatter, soft core | Quick snacks or solo meals |
Choosing the right method depends on how much you value that bottom side crunch. While the oven gives you the most height, the stovetop method creates a crust that's almost like a savory doughnut.
Key Specs for Your Biscuit Bake
When you’re looking for a no fuss addition to a meal, these numbers keep you on track. I’ve tested this in various ovens, and staying within these windows prevents the dreaded "burnt bottom, raw middle" disaster.
Checkpoint 1: The Melt Heat your butter just until liquid but not bubbling. If the butter is too hot, it will cook the garlic immediately, losing that fresh bite.
Checkpoint 2: The Sizzle Listen for a faint sizzle when you place the biscuits on the tray if you’ve pre brushed it. This means the Maillard reaction is starting the second they touch the heat.
Checkpoint 3: The Internal Pull At 15 minutes, the center should feel firm when pressed lightly. If it’s soft like a marshmallow, give it 2 more minutes.
Breaking Down the Savory Ingredient Science
| Ingredient | Science Role | Pro Secret |
|---|---|---|
| Unsalted Butter | Moisture Barrier | Use European style butter for higher fat content and less water |
| Fresh Garlic | Sulfuric Aromatics | Mince 10 minutes before using to allow the allicin to fully develop |
| Dried Rosemary | Woody Structure | Crushing the leaves between your palms releases trapped oils instantly |
| Sea Salt | Flavor Potentiator | Larger grains provide "pops" of saltiness that contrast the sweet dough |
Essential Tools for the Perfect Crunch

You don't need a gourmet kitchen for this, but a few basics make the job easier. A heavy duty baking sheet is my go to because it distributes heat evenly, preventing the edges from burning while the middle stays doughy.
If you have a cast iron skillet, that's even better for getting those crispy, fried edges that my family fights over.
A silicone pastry brush is another life saver here. Unlike the old-fashioned bristle brushes, it doesn't shed hairs into your butter and it's much easier to clean after dealing with sticky dough.
Finally, grab a small glass bowl for your herb butter you want something microwave safe so you can reheat it quickly if the butter starts to solidify before you’re done brushing.
step-by-step Guide to Golden Biscuits
- Preheat the oven to 375°F. Note: A hot start is vital for the steam to lift the layers.
- Melt 4 tbsp unsalted butter in a small bowl.
- Mince 2 cloves garlic and stir into the butter with 1 tsp garlic powder, 1 tbsp parsley, and 0.5 tsp rosemary.
- Arrange the 16 oz can of biscuits on a baking sheet, leaving an inch between each.
- Brush half of the herb butter over the tops until every crevice is coated.
- Sprinkle 0.25 tsp sea salt evenly over the buttered tops.
- Bake for 12 to 15 minutes until the tops are deeply golden and crackling.
- Apply the remaining butter mixture immediately after removing from the oven.
- Top with 0.5 cup cheddar cheese (if using) until it starts to melt into the layers.
- Rest for 2 minutes on the pan to let the bottoms crisp up.
Solving Common Garlic Biscuit Flaws
Why Your Biscuits Stayed Flat
If your biscuits didn't rise, the dough might have been too warm before entering the oven. The fat inside needs to be cold so it melts slowly, leaving air pockets behind. If the dough sits on a hot stove while the oven preheats, the fat leaks out, and you get a leaden puck instead of a flaky biscuit.
Why Your Garlic Tastes Bitter
Garlic turns bitter when it burns. If you mince it into tiny dust like particles, it will scorch in the 375°F heat. Keep your mince slightly coarser or use the "post bake brush" method where you save the fresh garlic for the final coating after the biscuits leave the oven.
| Problem | Root Cause | Solution |
|---|---|---|
| Soggy Bottoms | Over greased pan | Use parchment paper or a silicone mat instead of extra spray |
| Burnt Garlic | Mince too fine | Use a mix of powder for base and fresh for the final brush |
| Pale Tops | Oven temp too low | Move the rack to the top third of the oven for the last 3 mins |
Common Mistakes Checklist
- ✓ Never crowd the pan; biscuits need airflow to crisp the sides.
- ✓ Pat the tops dry if there is any "can liquid" before brushing butter.
- ✓ Use fresh parsley only at the end to keep the color vibrant green.
- ✓ Don't skip the sea salt; the dough itself is often quite sweet.
Tasty Swaps for Savory Herb Biscuits
I love a recipe that plays well with others. If you don't have rosemary on hand, don't sweat it. You can lean into a Mediterranean vibe by using dried oregano and a sprinkle of parmesan cheese.
For a "garlic drop biscuits no cheese" style, you can even cut the biscuits into quarters before baking to create more surface area for the butter to cling to.
If you're watching the budget, remember that dried herbs are your best friend. While fresh parsley is beautiful, a pinch of dried parsley works just as well for flavor. This is a real life recipe use what you have in the pantry!
| Original Ingredient | Substitute | Why It Works |
|---|---|---|
| Fresh Parsley | Dried Oregano | Stronger earthy flavor; use 1/3 the amount of fresh |
| Unsalted Butter | Salted Butter | Adds depth. Note: Omit the extra sea salt if using |
| Sea Salt | Everything Bagel Seasoning | Adds crunch and onion notes for a bolder profile |
For those looking for a different texture, these biscuits are a great companion to a Steak and Noodles Recipe where they can soak up the savory gravy. Or, if you're doing a sheet pan night, they fit right alongside a Roasted Sheet Pan recipe for a complete meal.
Storing and Reviving Your Leftover Biscuits
In the rare event that you have leftovers, they store surprisingly well. Keep them in an airtight container or a zip top bag in the fridge for up to 3 days. To reheat, avoid the microwave! It turns the dough chewy and tough.
Instead, pop them back into a toaster oven or air fryer at 300°F for 4 minutes. This restores the "shatter" to the crust.
For long term storage, you can freeze the baked biscuits for up to 2 months. Wrap them individually in foil so you can grab just one for a quick lunch. To use up scraps or "stale" biscuits, I like to chop them up and bake them for another 10 minutes to make the most incredible garlic herb croutons you've ever tasted.
It's zero waste and 100% flavor.
Perfect Dishes to Serve Alongside Biscuits
These biscuits are basically a blank canvas for comfort. They are the ultimate side for a Creamy Garlic Tuscan recipe because they can be used to scoop up every last drop of that velvety sauce. In our house, we also love serving them with a big bowl of chili or a simple roasted chicken.
If you want to go the breakfast route, split them open and top them with a fried egg and a dash of hot sauce. The savory herb infusion makes them feel much more sophisticated than a standard breakfast sandwich.
Whatever you pair them with, make sure they get to the table while they are still steaming hot that's when the "shatter" is at its peak.
Chef's Tip: If you want an even deeper flavor, grate the garlic into the butter rather than mincing it. This creates a "garlic paste" that emulsifies with the fat, ensuring every single bite has a uniform hit of flavor.

Recipe FAQs
What herbs to put in biscuits?
Use a blend of dried rosemary and fresh parsley. Rosemary adds a woody depth that complements the garlic, while fresh parsley brightens the final product. Crush the dried rosemary leaves between your palms before adding to release the maximum amount of essential oil.
How do you improve canned biscuits?
Cut them into quarters and brush generously with herb butter. Increasing the surface area allows the butter to penetrate the layers, leading to a much flakier, more savory final product. This technique mimics the steam lift action of professional dough layering.
What's a good seasoning to put on biscuits?
Use a combination of fresh minced garlic and coarse sea salt. The fresh garlic provides an initial punch that mellows during baking, while coarse salt creates pleasing little pops of flavor contrast. This savory blend pairs wonderfully with rich sides like our Crockpot Scalloped Potatoes Recipe.
What is the secret to a good biscuit?
Ensure your butter is cold but brushable, and your oven is fully preheated to 375°F. The cold fat turns to steam rapidly upon hitting the high heat, forcing the layers apart for maximum lift. If you master this temperature control here, you’ll apply that knowledge perfectly when making the crispy edges in a Ground Beef Stir recipe.
Can I use garlic powder instead of fresh garlic?
No, use both for the best flavor depth. Garlic powder provides a uniform, toasted background note, but fresh minced garlic gives you that sharp, bright pungency. For the freshest taste, use the powder in the initial butter bath and brush the fresh mince on immediately after baking.
How do I prevent the garlic on top from burning?
Brush the fresh garlic component on after the biscuits come out of the oven. Keep the initial coating simple, perhaps just butter and dried herbs, and save the highly perishable fresh garlic mixture for the final brush when the biscuits are done baking and cooling slightly.
Is it necessary to use unsalted butter?
No, using salted butter is fine, but adjust the added salt. If you use salted butter, omit the additional sea salt called for in the recipe entirely, as canned dough already contains significant sodium. Over salting is the fastest way to ruin a batch of savory biscuits.
Garlic Herb Can Biscuits
Ingredients:
Instructions:
Nutrition Facts:
| Calories | 221 kcal |
|---|---|
| Protein | 4.1 g |
| Fat | 13.8 g |
| Carbs | 21.4 g |
| Fiber | 0.6 g |
| Sugar | 3.2 g |
| Sodium | 545 mg |
