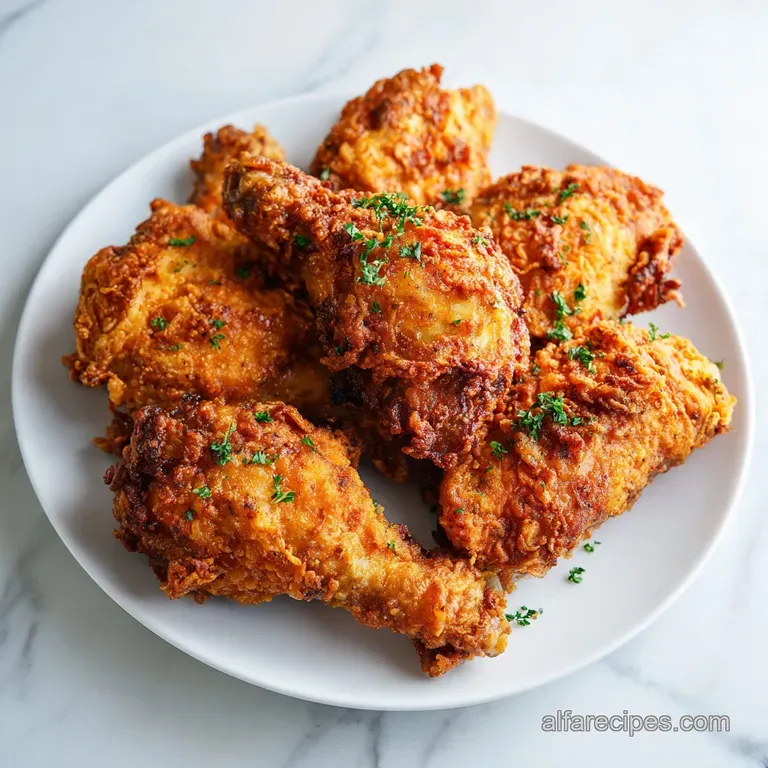
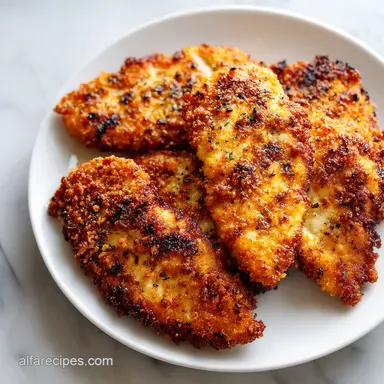
Pan Fried Chicken: Juicy and Crispy
- Time: Active 10 mins, Passive 10 mins, Total 20 mins
- Flavor/Texture Hook: Shatter crisp exterior with a velvety, tender center.
- Perfect for: Busy weeknight dinners or a quick protein boost for meal prep.
- Master My Simple Pan Fried Chicken Recipe
- Thermodynamics of the Perfect Sear
- Component Analysis for Better Results
- The Pantry Staples You Need
- The Tools for the Job
- Step-by-Step Cooking Guide
- Avoiding Common Cooking Mistakes
- Adapting for Every Diet
- Storage and Zero Waste Tips
- Serving Your Hearty Meal
- Dispelling Kitchen Myths
- Recipe FAQs
- 📝 Recipe Card
Master My Simple pan-fried Chicken Recipe
The first time I tried making pan-fried Chicken for my family, it was a total disaster. I had the heat too high, the flour was flying everywhere, and the middle was still raw while the outside looked like charcoal.
I stood there in my smoky kitchen, feeling like I’d failed a basic test of adulthood. But that failure was the best teacher I ever had, because it forced me to stop guessing and start actually watching how the meat reacted to the heat.
Now, when I drop a piece of seasoned chicken into the skillet, that first sizzle is music to my ears. I know exactly when to flip it by the way the edges turn opaque and golden. There’s something so satisfying about a hearty, no fuss meal that brings everyone to a crowded table, reaching for the last piece.
We’ve all been there, trying to get dinner on the table while life is happening at full speed, and this recipe is my secret weapon for those real life moments.
It’s all about the rhythm of the kitchen. Once you get the hang of the prep flow, you’ll find yourself making this once a week without even looking at the instructions.
It isn’t just about feeding people; it’s about that feeling of success when you cut into a piece and see the steam rise from a perfectly cooked breast. Trust me, once you nail this, you'll never look back at those frozen nuggets again.
Thermodynamics of the Perfect Sear
The Maillard Reaction: This chemical process occurs when proteins and sugars are exposed to high heat, creating hundreds of different flavor compounds and that signature brown crust.
By patting the meat dry and using a light flour dusting, we ensure the heat goes directly into browning rather than evaporating surface moisture.
1. The Maillard Reaction Mastery
When we talk about browning, we are really talking about chemistry. For a successful pan-fried Chicken experience, the pan needs to be hot enough to trigger the Maillard reaction immediately.
If the pan is too cold, the chicken will just sit there and steam in its own juices, resulting in a rubbery texture instead of that shatter crisp finish we want.
2. Pounding for Thermal Conductivity
Chicken breasts are notoriously uneven, with a thick end and a thin "tail." If you cook them as is, the thin part turns into shoe leather before the thick part is even safe to eat.
By pounding them to a uniform half inch thickness, you ensure every square inch of the meat hits the heat at the same time, leading to a much more predictable outcome.
3. The 5 Minute Rest
Never cut into your chicken right after it leaves the pan. During the cooking process, the muscle fibers tighten and push juices toward the center. Letting the meat rest for five minutes allows those fibers to relax and reabsorb the moisture, ensuring every bite is velvety rather than dry.
| Thickness | Internal Temp | Rest Time | Visual Cue |
|---|---|---|---|
| 1/2 inch | 165°F | 5 mins | Juices run clear when poked |
| 3/4 inch | 165°F | 7 mins | Surface is deeply bronzed |
| 1 inch | 165°F | 8 mins | Firm feel when pressed |
A thicker cut will always require a slightly lower heat and a longer time to ensure the center reaches a safe temperature without the outside burning. This is why I always recommend sticking to the half inch thickness for this quick cooking method.
Component Analysis for Better Results
| Ingredient | Science Role | Pro Secret |
|---|---|---|
| Avocado Oil | High Smoke Point | Stays stable at the high temperatures needed for a crisp sear. |
| All Purpose Flour | Starch Gelatinization | Absorbs surface moisture to create a thin, crispy barrier. |
| Kosher Salt | Protein Denaturation | Breaks down lean muscle fibers to keep the meat tender. |
Choosing the right fat is just as important as the meat itself. While butter adds a nutty richness, its smoke point is too low for the initial sear. By starting with avocado oil and adding butter at the very end, we get the best of both worlds: over high heat stability and a silky, buttery finish.
The Pantry Staples You Need
For this pan-fried Chicken, we are keeping things simple and effective. I’ve found that using a blend of dry spices gives you a much more consistent flavor than relying on fresh herbs alone, which can sometimes burn in the hot oil.
- 1.5 lbs chicken breast, boneless and skinless: The lean star of the show.
- Substitute: Chicken thighs (boneless) for more fat and flavor. Why this? Chicken breasts provide a clean, mild canvas for the spices and cook incredibly fast.
- 1/4 cup all purpose flour: The base for our crust.
- Substitute: Cornstarch or almond flour. Why this? It creates a light, golden veil that protects the meat from drying out.
- 2 tbsp avocado oil: Our over high heat cooking medium.
- Substitute: Grapeseed oil or canola oil. Why this? It has a high smoke point (520°F), preventing a smoky kitchen and bitter flavors.
- 1/2 tsp smoked paprika: For color and a hint of woodsy flavor.
- Substitute: Sweet paprika or a pinch of cayenne for heat.
- 1 tbsp unsalted butter: The finishing touch for flavor.
- Substitute: Ghee for a higher smoke point with similar flavor.
- Spices: 1 tsp kosher salt, 1/2 tsp black pepper, 1/2 tsp garlic powder, 1/2 tsp onion powder.
- Aromatics: 2 sprigs fresh thyme and 2 cloves garlic, smashed.
Chef's Tip: Freeze your butter for 10 minutes before adding it to the pan at the end. This prevents it from browning too quickly, allowing the milk solids to toast slowly and baste the chicken perfectly.
If you are looking for another way to keep things juicy, you might want to try a Chicken in Broth recipe for those nights when you want something even more tender and comforting.
The Tools for the Job
You don't need a kitchen full of gadgets, but two pieces of equipment are non negotiable for real life success. First, a heavy bottomed skillet cast iron is my personal favorite is essential. It holds onto heat like a champ, so when you add the cold meat, the temperature doesn't plummet.
1. The Heavy Bottomed Skillet
A thin pan will give you hot spots, meaning one side of your chicken will be burnt while the other is pale. A 12 inch cast iron skillet or a high-quality stainless steel pan allows for even heat distribution. This is the foundation of any good pan-fried Chicken.
2. The Reliable Meat Mallet
Don't try to use a heavy can or the bottom of a saucepan if you can avoid it. A dedicated meat mallet allows you to control the force and get a perfectly flat surface. If you don't have one, just be sure to wrap the chicken in plastic wrap first to avoid any "kitchen splatter" incidents.
step-by-step Cooking Guide

Success with Fried Chicken is all about the preparation. I like to set up a little assembly line on my counter so I’m not running around once the oil is hot.
- Pound the chicken. Place the 1.5 lbs chicken breast between two sheets of plastic wrap and pound to 1/2 inch thickness. Note: This ensures the meat cooks evenly and quickly.
- Dry the meat. Pat each piece thoroughly dry with paper towels. Note: Moisture is the enemy of a crisp crust.
- Mix the coating. In a shallow bowl, whisk together the 1/4 cup flour, salt, pepper, smoked paprika, garlic powder, and onion powder.
- Dredge lightly. Press each side of the chicken into the flour mixture, then shake off every bit of excess. The coating should be almost invisible.
- Heat the pan. Add 2 tbsp avocado oil to your skillet over medium high heat until the oil shimmers and a pinch of flour sizzles immediately.
- Sear the first side. Lay the chicken in the pan away from you to avoid splashes. Cook for 4-5 minutes until the edges are golden and the meat releases easily.
- Flip the chicken. Use tongs to turn the pieces over. Cook for another 3-4 minutes until the internal temperature hits 160°F.
- Add the aromatics. Drop in the 1 tbsp butter, 2 sprigs thyme, and 2 smashed garlic cloves.
- Baste the meat. Tilt the pan and use a large spoon to pour the foaming butter over the chicken for 1 minute until it smells nutty and the meat reaches 165°F.
- Rest the meat. Transfer to a cutting board and let it sit for 5 minutes until the juices settle.
| Fresh Ingredients | Shortcut Ingredients | Flavor Impact |
|---|---|---|
| Fresh Garlic & Thyme | Garlic Powder & Dried Thyme | Fresh aromatics provide a brighter, more vibrant finish. |
| Whole Chicken Breast | Pre sliced Cutlets | Slicing yourself allows for better control over thickness. |
| Hand mixed Spices | store-bought Poultry Rub | Homemade mixes let you control the salt levels perfectly. |
Using the right technique here is very similar to what I do for my 30 Minute One recipe, where the focus is on maximizing flavor in a short window of time.
Avoiding Common Cooking Mistakes
Even the best home cooks run into trouble sometimes. The most common issue I see with pan-fried Chicken is people getting impatient. If you try to flip the meat before it’s ready, the crust will stick to the pan and tear right off.
Soggy Coating Issues
If your chicken comes out greasy or soggy, it’s usually because the oil wasn't hot enough when you started, or you overcrowded the pan. When you put too much cold meat in at once, the oil temperature drops, and instead of frying, the chicken starts to poach in its own moisture.
Dry and Overcooked Meat
Breast meat is lean and unforgiving. If you leave it in the pan until it "looks done," it's probably already overcooked. Use a meat thermometer to pull it at 160°F the carryover heat will bring it to the safe 165°F while it rests.
| Problem | Root Cause | Solution |
|---|---|---|
| Coating falls off | Meat was too wet before dredging | Pat dry with paper towels until bone dry. |
| Burnt outside, raw inside | Heat was too high | Reduce heat to medium and pound chicken thinner. |
| Greasy texture | Oil temperature was too low | Wait for oil to shimmer before adding meat. |
Common Mistakes Checklist: ✓ Pat chicken completely dry before dredging (prevents the flour from turning into paste) ✓ Shake off all excess flour (a thick layer will become gummy) ✓ Preheat the skillet for 3 to 5 minutes before adding any oil ✓ Resist the
urge to move the chicken for at least 3 minutes after it hits the pan ✓ Use a thermometer to check for 165°F (never guess with poultry)
Adapting for Every Diet
We often have friends over who have different dietary needs, and this Simple pan-fried chicken is actually very easy to modify without losing that hearty, family style feel.
The Low Carb Swap
If you are following a keto lifestyle, you can skip the flour entirely or use a very light dusting of almond flour. Honestly, don't even bother with the "breading" if you want to keep it simple the spices alone will still create a beautiful crust if your pan is hot enough.
gluten-free Breading Options
For my gluten-free friends, cornstarch is actually a fantastic substitute for all purpose flour. It creates an even crispier, "glass like" crunch that stays firm even if you add a sauce later. Just use the same 1:1 ratio.
If you want a specific outcome, try these variations: If you want extra crunch, use a 50/50 mix of flour and cornstarch. If you want a deeper flavor, swap the avocado oil for bacon fat. If you want a spicy kick, add a teaspoon of cayenne pepper to the flour.
Storage and Zero Waste Tips
In our house, we hate seeing good food go to waste. If you have leftovers of this pan-fried Chicken, they make the most incredible addition to a Meal Prep Lunch recipe for the next day.
- Fridge
- Keep in an airtight container for up to 4 days.
- Freezer
- Wrap tightly in foil and place in a freezer bag for up to 3 months.
- Reheating
- Avoid the microwave if you can! It turns the crust soggy. Instead, pop it into a 350°F oven (180°C) or an air fryer for 5 minutes to bring back the crunch.
Zero Waste Tip: Don't throw away those herb stems or the garlic skins! I keep a "stock bag" in my freezer where I toss all my veggie scraps. When the bag is full, I simmer it all with some water to make a free, flavorful base for soups.
Serving Your Hearty Meal
This chicken is the ultimate versatile protein. For a crowded table, I like to serve it family style on a big platter with lemon wedges and a side of roasted vegetables. It’s the kind of no fuss meal that makes everyone feel at home.
The 15 Minute Power Bowl
Slice the cold or warm chicken and layer it over quinoa with some fresh greens, avocado, and a quick vinaigrette. It's a real life solution for those days when you need a healthy, filling lunch but have zero time to cook from scratch.
A Bistro Style Classic
If you're looking for something a bit more refined, serve the chicken whole over a pile of buttery mashed potatoes with a simple green salad on the side. The contrast between the crispy chicken and the velvety potatoes is pure comfort.
This is a staple in our house whenever we need a bit of a pick me-up after a long week.
When scaling this recipe up for a party, remember to work in batches. If you try to cook 3 lbs of chicken in one pan, you'll end up with a soggy mess. Keep the finished pieces on a wire rack in a warm oven (around 200°F) to maintain that "shatter" crunch while you finish the rest of the meat.
Dispelling Kitchen Myths
One big myth is that you need an inch of oil to get a crispy result. That’s just not true. A thin layer of oil is all you need if your heat management is on point. Another common misconception is that you should wash your chicken before cooking. Please, don't do this!
It just spreads bacteria around your sink and makes the meat too wet to sear properly.
Finally, let's talk about "sealing in the juices." Searing meat does not actually create an impermeable barrier. Moisture is still lost during cooking, but the crust provides such an intense burst of flavor through the Maillard reaction that we perceive the meat as being juicier and more satisfying.
The real secret to juiciness isn't the sear it's the rest period afterward. Keep it simple, keep it hot, and let it rest. Happy cooking!

Recipe FAQs
What is the best way to pan fry chicken?
Pound the chicken to an even half inch thickness first. This ensures uniform cooking speed, which is critical for hitting safe internal temperatures without drying out the thinner parts.
Use a heavy bottomed skillet with oil heated until it shimmers, then cook without moving it for the first 4-5 minutes.
How long does chicken take to cook on a frying pan?
Expect about 8 to 10 minutes total for half inch thick breasts. Cook for 4-5 minutes per side over medium high heat until the internal temperature reaches 160°F. Always allow the meat to rest for 5 minutes off the heat to finish cooking to a safe 165°F internally.
Should you flour chicken before pan-frying?
Yes, a very light dusting of flour is recommended. The flour absorbs the surface moisture, allowing the Maillard reaction to occur immediately, which builds a crisp, golden crust. Be sure to shake off every bit of excess flour so the coating isn't gummy.
How long should you fry chicken for?
Fry each side for 4 to 5 minutes on medium high heat initially. The goal is to develop the crust quickly; you are not trying to cook it through at this stage. The actual total cooking time depends entirely on the thickness of your cutlets, so rely on a thermometer over the clock.
Is it true that searing meat locks in all the juices?
No, this is a common misconception. Searing creates flavor through the Maillard reaction, but it does not create an impenetrable seal to trap moisture. The true secret to juiciness is allowing the meat to rest for 5 minutes after cooking so the muscle fibers can reabsorb the juices.
What temperature should the oil be before adding the chicken?
Heat the oil until it shimmers slightly and a pinch of flour sizzles immediately. If the oil is too cool, the chicken will absorb it and become greasy rather than crisp. If you master this sear, the same high heat principle for crust development works beautifully in our Chicken Lettuce Wrap recipe.
Can I use butter instead of oil for the entire frying process?
No, stick with a high smoke point oil for the initial sear. Butter contains milk solids that will burn quickly at the high temperatures needed for a good crust. Use avocado or grapeseed oil to sear, then drop in a tablespoon of butter near the end for basting and flavor.
pan-fried Chicken Secrets
Ingredients:
Instructions:
Nutrition Facts:
| Calories | 308 kcal |
|---|---|
| Protein | 38.5 g |
| Fat | 13.2 g |
| Carbs | 6.5 g |
| Fiber | 0.4 g |
| Sugar | 0.1 g |
| Sodium | 620 mg |
